Groobee iOS SDK 설치 가이드 (Native)
이 문서는 Groobee iOS Native SDK의 설치 절차(Swift, Objective-C)를 정리한 문서입니다. 현재 권장 버전은 iOS SDK 변경 로그에서 확인하세요.
기능별 사용 문서는 아래 문서를 참고하세요.
- iOS SDK 개요 및 지원 범위
- iOS SDK 회원 정보 및 푸시 상태 연동
- iOS SDK 행동 이력 수집
- iOS SDK 하이브리드 앱 데이터 동기화
- iOS SDK 추천 상품 연동
- iOS SDK 주의사항 및 로그 유틸리티
Flutter 앱(iOS 빌드)에서 MethodChannel로 연동하는 경우에는 iOS Flutter SDK 설치 가이드를 참고하세요.
목차
설치 전 확인
- Groobee 서비스키
- 앱 정보 등록 (앱 패키지명 / Bundle ID / 플랫폼 정보)
- 푸시 사용 시 Firebase 프로젝트 설정과 Firebase 비공개키 업로드 — 어드민 등록 방법은 어드민 푸시 설정 가이드를 참고하세요.
- APNS 인증 키(
.p8), Key ID, Team ID - Xcode에서 Push Notifications, Background Modes 활성화
SDK 개요와 iOS 버전 이슈는 iOS SDK 개요 및 지원 범위 문서에 정리했습니다.
SDK 설치
1. GroobeeKit 라이브러리 설치
앱 프로젝트 폴더에 Podfile을 생성하고 아래와 같이 추가합니다.
Native:
React-Native 참고:
pod 'GoogleUtilities', :modular_headers => true
pod 'FirebaseCore', :modular_headers => true
pod 'FirebaseMessaging', :modular_headers => true
pod 'GroobeeKit'
2. Pod install
터미널에서 앱 프로젝트 경로로 이동한 뒤 pod install을 실행합니다.
AppDelegate 설정
import 및 상속 설정
Swift:
import UIKit
import FirebaseCore
import FirebaseMessaging
import GroobeeKit
import UserNotifications

@main
class AppDelegate: UIResponder, UIApplicationDelegate {
    ...
}
Objective-C:
#import "AppDelegate.h"
#import <GroobeeKit/GroobeeKit-Swift.h>

@import FirebaseCore;
@import FirebaseMessaging;
@import UserNotifications;

@interface AppDelegate () <UNUserNotificationCenterDelegate, FIRMessagingDelegate>

@end

@implementation AppDelegate

...
React-Native 참고:
#import "AppDelegate.h"

#import <React/RCTBundleURLProvider.h>
#import <GroobeeKit/GroobeeKit-Swift.h>
#import <UserNotifications/UserNotifications.h>
#import <FirebaseCore/FirebaseCore.h>
#import <FirebaseMessaging/FirebaseMessaging.h>

@interface AppDelegate () <UNUserNotificationCenterDelegate, FIRMessagingDelegate>

@end

@implementation AppDelegate

...
AppDelegate 주요 설정 항목
| 클래스 | 메소드 | 설명 |
|---|---|---|
GroobeeConfig |
setServiceKey() |
필수. 그루비 어드민에서 발급받은 서비스키를 등록합니다. |
GroobeeConfig |
setInAppMsgMarginTop() |
선택. 인앱메시지 상단 노출일 경우 마진값을 설정합니다. |
GroobeeConfig |
setInAppMsgMarginBottom() |
선택. 인앱메시지 하단 노출일 경우 마진값을 설정합니다. |
GroobeeConfig |
setNotificationSettingsButton() |
선택. 푸시 알림 하단에 수신 설정 버튼을 추가합니다. 버튼 텍스트는 NSLocalizedString으로 다국어화된 텍스트 사용을 권장하며, 앱에 알림 수신 설정 페이지로 이동할 딥링크 처리가 별도로 필요합니다. |
Groobee |
configure() |
필수. 설정한 GroobeeConfig를 앱에 적용합니다. |
FirebaseApp |
configure() |
필수. FCM 활용을 위한 Firebase 연동입니다. |
Messaging |
messaging().delegate |
필수. FCM 활용을 위한 Firebase Messaging 연동입니다. |
Swift 예시
AppDelegate.swift의 application(_:didFinishLaunchingWithOptions:) 메소드에 다음 코드를 추가합니다.
func application(
    _ application: UIApplication,
    didFinishLaunchingWithOptions launchOptions: [UIApplication.LaunchOptionsKey: Any]?
) -> Bool {
    let serviceKey = "서비스키"
    let bundleID = Bundle.main.bundleIdentifier!

    let groobeeConfig = GroobeeConfig.GroobeeConfigBuilder()
        .setServiceKey(serviceKey: serviceKey, bundleId: bundleID)
        .setInAppMsgMarginTop(50)
        .setInAppMsgMarginBottom(17)
        .setNotificationSettingsButton("알림설정", "myapp://set/noti")
        .build()

    Groobee.configure(groobeeConfig: groobeeConfig)

    FirebaseApp.configure()
    Messaging.messaging().delegate = self
    pushNotiConfirmation()
    return true
}

func pushNotiConfirmation() {
    let center = UNUserNotificationCenter.current()
    center.requestAuthorization(
        options: [.badge, .alert, .sound],
        completionHandler: { granted, error in
            if granted {
                print("Notifications permission granted.")
                DispatchQueue.main.async {
                    UIApplication.shared.registerForRemoteNotifications()
                }
            } else {
                print("Notifications permission denied.")
            }
        }
    )
    center.delegate = self
}
Objective-C 예시
- (BOOL)application:(UIApplication *)application didFinishLaunchingWithOptions:(NSDictionary *)launchOptions {
    NSString *bundleId = [[NSBundle mainBundle] bundleIdentifier];
    NSString *serviceKey = @"서비스키";

    GroobeeConfig *groobeeConfig = [[[[[[[GroobeeConfigBuilder alloc] init]
        setServiceKeyWithServiceKey:serviceKey bundleId:bundleId]
        setNotificationSettingsButton:@"알림설정" deeplink:@"myapp://set/noti"]
        setInAppMsgMarginTop:17]
        setInAppMsgMarginBottom:50]
        build];

    [Groobee configureWithGroobeeConfig:groobeeConfig];

    [FIRApp configure];
    [FIRMessaging messaging].delegate = self;
    [self pushNotiConfirmation];
    [application registerForRemoteNotifications];

    return YES;
}

- (void)pushNotiConfirmation {
    if ([UNUserNotificationCenter class] != nil) {
        [UNUserNotificationCenter currentNotificationCenter].delegate = self;
        UNAuthorizationOptions authOptions =
            UNAuthorizationOptionAlert |
            UNAuthorizationOptionSound |
            UNAuthorizationOptionBadge;

        [[UNUserNotificationCenter currentNotificationCenter]
            requestAuthorizationWithOptions:authOptions
                          completionHandler:^(BOOL granted, NSError * _Nullable error) {
                          }];
    }
}
LifeCycle 설정
그루비의 세션과 메시지 처리를 위해 앱의 LifeCycle을 GroobeeKitLifeCycle에 연결합니다.
iOS 13 미만
Swift (AppDelegate.swift):
func applicationWillResignActive(_ application: UIApplication) {
    GroobeeKitLifeCycle.sceneWillResignActive()
}

func applicationDidEnterBackground(_ application: UIApplication) {
    GroobeeKitLifeCycle.sceneDidEnterBackground()
}

func applicationWillEnterForeground(_ application: UIApplication) {
    GroobeeKitLifeCycle.sceneWillEnterForeground()
}

func applicationDidBecomeActive(_ application: UIApplication) {
    GroobeeKitLifeCycle.sceneDidBecomeActive()
}

func applicationWillTerminate(_ application: UIApplication) {
    GroobeeKitLifeCycle.sceneDidDisconnect()
}
Objective-C / React-Native (AppDelegate.m):
- (void)applicationWillResignActive:(UIApplication *)application {
    [GroobeeKitLifeCycle sceneWillResignActive];
}

- (void)applicationDidEnterBackground:(UIApplication *)application {
    [GroobeeKitLifeCycle sceneDidEnterBackground];
}

- (void)applicationWillEnterForeground:(UIApplication *)application {
    [GroobeeKitLifeCycle sceneWillEnterForeground];
}

- (void)applicationDidBecomeActive:(UIApplication *)application {
    [GroobeeKitLifeCycle sceneDidBecomeActive];
}

- (void)applicationWillTerminate:(UIApplication *)application {
    [GroobeeKitLifeCycle sceneDidDisconnect];
}
iOS 13 이상
Swift (SceneDelegate.swift):
func sceneDidDisconnect(_ scene: UIScene) {
    GroobeeKitLifeCycle.sceneDidDisconnect()
}

func sceneDidBecomeActive(_ scene: UIScene) {
    GroobeeKitLifeCycle.sceneDidBecomeActive()
}

func sceneWillResignActive(_ scene: UIScene) {
    GroobeeKitLifeCycle.sceneWillResignActive()
}

func sceneWillEnterForeground(_ scene: UIScene) {
    GroobeeKitLifeCycle.sceneWillEnterForeground()
}

func sceneDidEnterBackground(_ scene: UIScene) {
    GroobeeKitLifeCycle.sceneDidEnterBackground()
}
Swift (AppDelegate.swift):
func application(
    _ application: UIApplication,
    didDiscardSceneSessions sceneSessions: Set<UISceneSession>
) {
    GroobeeKitLifeCycle.sceneDidDisconnect()
}
Objective-C (SceneDelegate.m):
- (void)sceneDidDisconnect:(UIScene *)scene {
    [GroobeeKitLifeCycle sceneDidDisconnect];
}

- (void)sceneDidBecomeActive:(UIScene *)scene {
    [GroobeeKitLifeCycle sceneDidBecomeActive];
}

- (void)sceneWillResignActive:(UIScene *)scene {
    [GroobeeKitLifeCycle sceneWillResignActive];
}

- (void)sceneWillEnterForeground:(UIScene *)scene {
    [GroobeeKitLifeCycle sceneWillEnterForeground];
}

- (void)sceneDidEnterBackground:(UIScene *)scene {
    [GroobeeKitLifeCycle sceneDidEnterBackground];
}
Objective-C (AppDelegate.m):
- (void)application:(UIApplication *)application
didDiscardSceneSessions:(NSSet<UISceneSession *> *)sceneSessions {
    [GroobeeKitLifeCycle sceneDidDisconnect];
}
Push Messaging Service 설정
FCM과 APNS 연동 방법
iOS의 경우 APNs 인증키를 FCM에 등록해야 FCM을 통한 푸시 발송이 가능합니다. \ 다음은 APNs 인증키를 FCM에 등록하는 방법예시입니다.
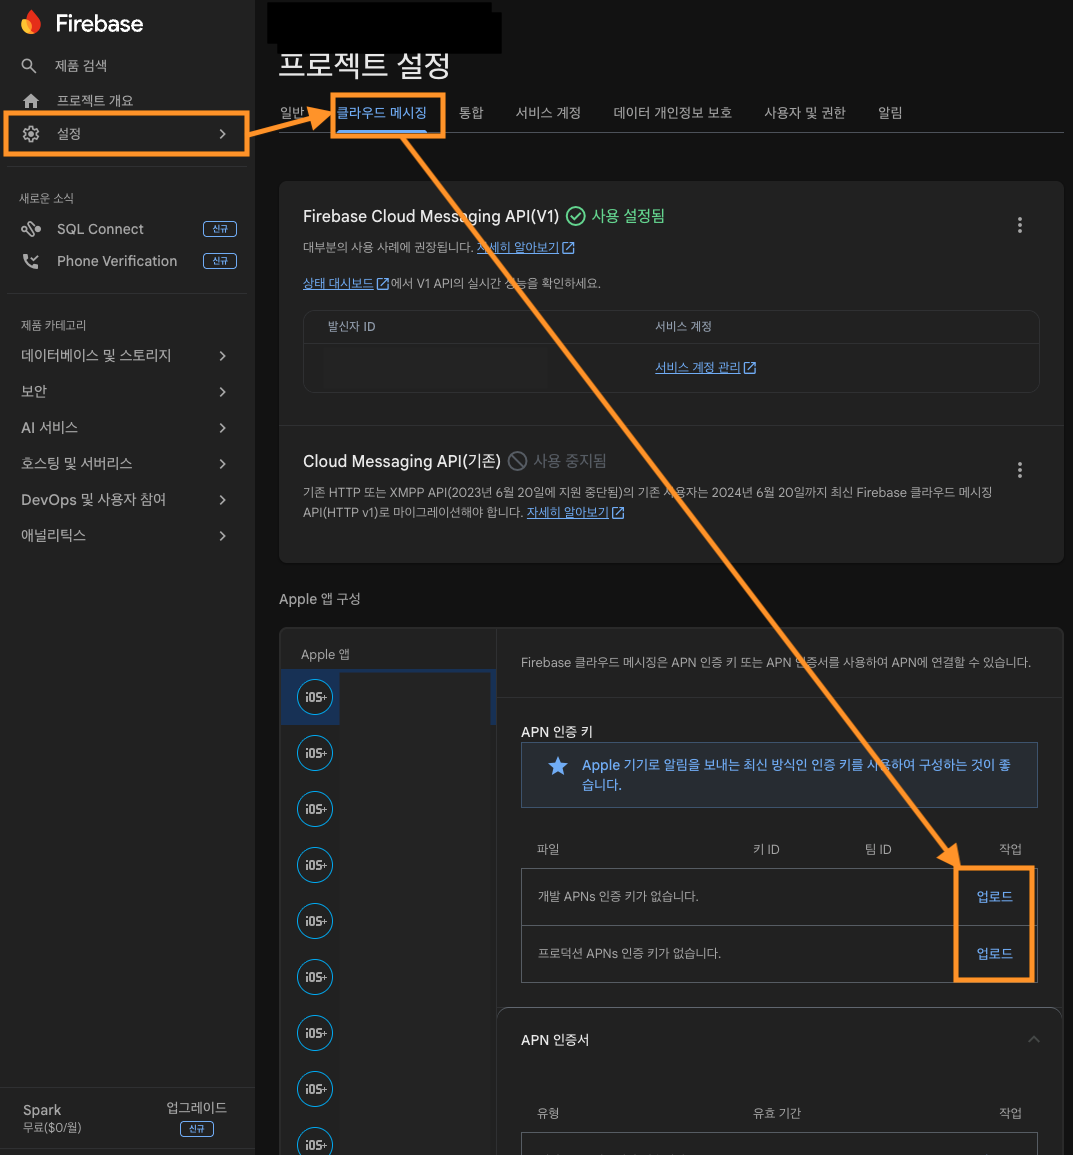
- Firebase 콘솔에서
설정>일반>클라우드 메시징메뉴로 진입한 후, 등록해둔 앱의 APN 인증키를 업로드 버튼을 누릅니다.
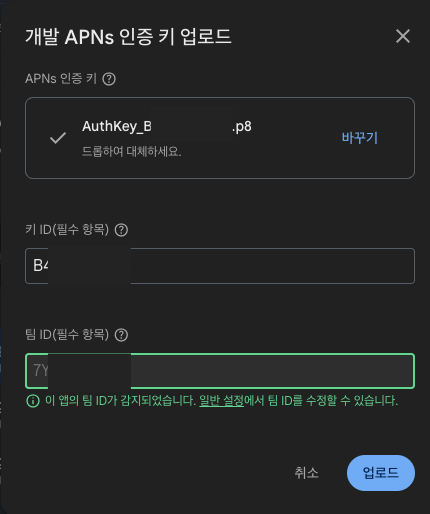
- 내려받은
.p8파일을 업로드하고 Key ID, Team ID를 입력해 업로드를 완료합니다.
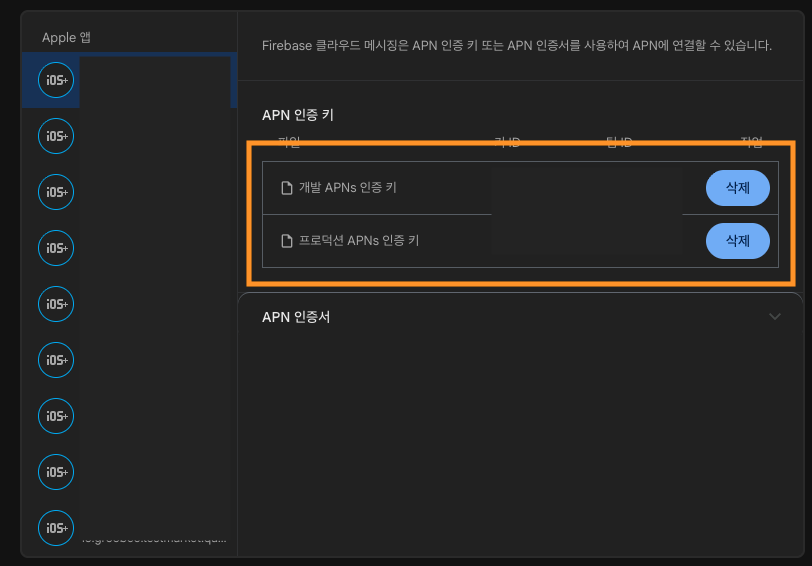
- 업로드가 완료되면 APNs 인증키가 등록된 것을 확인할 수 있습니다.
참고 링크:
- APNS 연동 공식 문서: Firebase Cloud Messaging for iOS
- Apple Auth Key 관리: Apple Developer Auth Keys
- Apple Team 정보: Apple Developer Account
FCM과 GroobeeKit 간 메시지 연동
아래 예시는 현재 권장 SDK 기준입니다. v.1.1.5 이상에서는 UNNotificationResponse를 SDK에 전달하면 일반 푸시 본체 탭과 알림 설정 액션 탭을 함께 처리할 수 있습니다.
알림 응답 처리는 Groobee.getInstance().userNotificationCenter(response:)에서 처리합니다. 이 메소드는 Groobee 푸시의 알림 본문 탭과 알림 설정 버튼 액션을 처리합니다. GroobeeNotification.getInstance().receiveService()는 아래 Rich Push 섹션의 Notification Service Extension에서 알림 표시 전 내용을 가공할 때 사용하는 메소드이며, 알림 응답 처리용이 아닙니다.
Swift:
extension AppDelegate: MessagingDelegate, UNUserNotificationCenterDelegate {
    func application(
        _ application: UIApplication,
        didRegisterForRemoteNotificationsWithDeviceToken deviceToken: Data
    ) {
        Messaging.messaging().apnsToken = deviceToken
    }

    func application(
        _ application: UIApplication,
        didReceiveRemoteNotification userInfo: [AnyHashable: Any],
        fetchCompletionHandler completionHandler: @escaping (UIBackgroundFetchResult) -> Void
    ) {
        Groobee.getInstance().didReceiveRemoteNotification(userInfo: userInfo)
        completionHandler(.newData)
    }

    func messaging(_ messaging: Messaging, didReceiveRegistrationToken fcmToken: String?) {
        let dataDict: [String: String] = ["token": fcmToken ?? ""]
        Groobee.getInstance().setPushToken(pushToken: fcmToken!)
        NotificationCenter.default.post(
            name: Notification.Name("FCMToken"),
            object: nil,
            userInfo: dataDict
        )
    }

    func userNotificationCenter(
        _ center: UNUserNotificationCenter,
        willPresent notification: UNNotification,
        withCompletionHandler completionHandler: @escaping (UNNotificationPresentationOptions) -> Void
    ) {
        completionHandler([.alert, .badge, .sound])
    }

    func userNotificationCenter(
        _ center: UNUserNotificationCenter,
        didReceive response: UNNotificationResponse,
        withCompletionHandler completionHandler: @escaping () -> Void
    ) {
        if Groobee.getInstance().userNotificationCenter(response: response) {
            // SDK가 처리됨 (일반 푸시 본체 탭 / 알림 설정 액션 탭 모두 포함)
        } else {
            // 호스트 앱의 비-Groobee 푸시 처리 로직
        }

        completionHandler()
    }
}
Objective-C:
- (void)application:(UIApplication *)application
didRegisterForRemoteNotificationsWithDeviceToken:(NSData *)deviceToken {
    [FIRMessaging messaging].APNSToken = deviceToken;
}

- (void)application:(UIApplication *)application
didReceiveRemoteNotification:(NSDictionary *)userInfo
fetchCompletionHandler:(void (^)(UIBackgroundFetchResult))completionHandler {
    [[Groobee getInstance] didReceiveRemoteNotificationWithUserInfo:userInfo];
    completionHandler(UIBackgroundFetchResultNewData);
}

- (void)messaging:(FIRMessaging *)messaging didReceiveRegistrationToken:(NSString *)fcmToken {
    NSDictionary *dataDict = [NSDictionary dictionaryWithObject:fcmToken forKey:@"token"];
    [[NSNotificationCenter defaultCenter] postNotificationName:@"FCMToken" object:nil userInfo:dataDict];
    [[Groobee getInstance] setPushTokenWithPushToken:fcmToken];
}

- (void)userNotificationCenter:(UNUserNotificationCenter *)center
       willPresentNotification:(UNNotification *)notification
         withCompletionHandler:(void (^)(UNNotificationPresentationOptions))completionHandler {
    completionHandler(
        UNNotificationPresentationOptionAlert |
        UNNotificationPresentationOptionBadge |
        UNNotificationPresentationOptionSound
    );
}

- (void)userNotificationCenter:(UNUserNotificationCenter *)center
didReceiveNotificationResponse:(UNNotificationResponse *)response
         withCompletionHandler:(void (^)(void))completionHandler {
    if ([[Groobee getInstance] userNotificationCenterWithResponse:response]) {
        // SDK가 처리됨 (일반 푸시 본체 탭 / 알림 설정 액션 탭 모두 포함)
    } else {
        // 호스트 앱의 비-Groobee 푸시 처리 로직
    }

    completionHandler();
}
v.1.1.5 미만 SDK 사용 시
v.1.1.5 미만 SDK를 사용 중이라면 위 didReceive 메소드 대신 아래 코드를 사용하세요. setNotificationSettingsButton 액션 처리는 v.1.1.5 이상에서 지원됩니다.
Swift:
func userNotificationCenter(
    _ center: UNUserNotificationCenter,
    didReceive response: UNNotificationResponse,
    withCompletionHandler completionHandler: @escaping () -> Void
) {
    let notification = response.notification
    let userInfo = notification.request.content.userInfo

    switch response.actionIdentifier {
    case UNNotificationDefaultActionIdentifier:
        Groobee.getInstance().userNotificationCenter(userInfo: userInfo)
    default:
        print("nil")
    }

    completionHandler()
}
Objective-C:
- (void)userNotificationCenter:(UNUserNotificationCenter *)center
didReceiveNotificationResponse:(UNNotificationResponse *)response
         withCompletionHandler:(void (^)(void))completionHandler {
    NSDictionary *userInfo = response.notification.request.content.userInfo;
    if ([response.actionIdentifier isEqualToString:@"com.apple.UNNotificationDefaultActionIdentifier"]) {
        [[Groobee getInstance] userNotificationCenterWithUserInfo:userInfo];
    }
    completionHandler();
}
메소드별 역할은 다음과 같습니다.
| 위치 | 메소드 | 역할 |
|---|---|---|
AppDelegate |
Groobee.getInstance().didReceiveRemoteNotification(userInfo:) |
푸시 수신 이벤트를 Groobee에 전달합니다. |
AppDelegate |
Groobee.getInstance().userNotificationCenter(response:) |
알림 본문 탭과 알림 설정 버튼 액션 등 Groobee 푸시 응답을 처리합니다. |
Notification Service Extension |
GroobeeNotification.getInstance().receiveService(...) |
Rich Push 이미지 첨부, 알림 카테고리 설정 등 표시 전 가공을 처리합니다. |
Notification Content Extension |
GroobeeNotification.getInstance().receiveContent(...) |
커스텀 알림 UI 표시를 처리합니다. |
Rich Push 설정
Service와 Content Extension은 기본 푸시 수신, 푸시 오픈/응답 처리, 푸시 토큰 등록에는 필수가 아닙니다.
일반 텍스트 푸시 수신과 푸시 본문 탭 응답 처리는 위 AppDelegate 연동만으로 처리할 수 있습니다. 알림 설정 버튼 액션 응답도 userNotificationCenter(response:)에서 처리하지만, 버튼을 실제 알림에 표시하려면 알림 카테고리가 적용되어야 합니다. Notification Service Extension을 추가하면 receiveService()가 알림 표시 전에 카테고리와 첨부 파일을 가공합니다.
Service와 Content를 추가한 Rich Push 방식을 사용하면 푸시 메시지 전환 상태 측정과 커스텀 푸시 메시지 확장이 가능합니다.
Notification Service Extension
사용자에게 전달되기 전 Remote Notification의 내용을 수정하는 확장입니다. 이미지, 비디오, 오디오, 특별한 형식의 콘텐츠를 알림에 추가하거나, 알림 메시지를 동적으로 생성하여 사용자에게 더 풍부한 정보를 제공할 수 있습니다.
Notification Service Extension은 이미지 첨부나 알림 표시 전 가공이 필요한 경우에만 추가합니다. 사용하지 않으면 일반 텍스트 푸시 수신/응답 처리는 가능하지만, 이미지가 포함된 Rich Push나 알림 표시 전 카테고리 설정은 처리되지 않습니다.
Notification Content Extension
앱의 알림에 대한 사용자 지정 인터페이스를 표시하는 확장입니다. 사용자 지정 색상, 브랜딩, 미디어, 동적 콘텐츠를 알림 인터페이스에 통합할 수 있습니다.
Notification Content Extension은 커스텀 알림 UI가 필요한 경우에만 추가합니다.
참고 링크:
Service 설정 예시
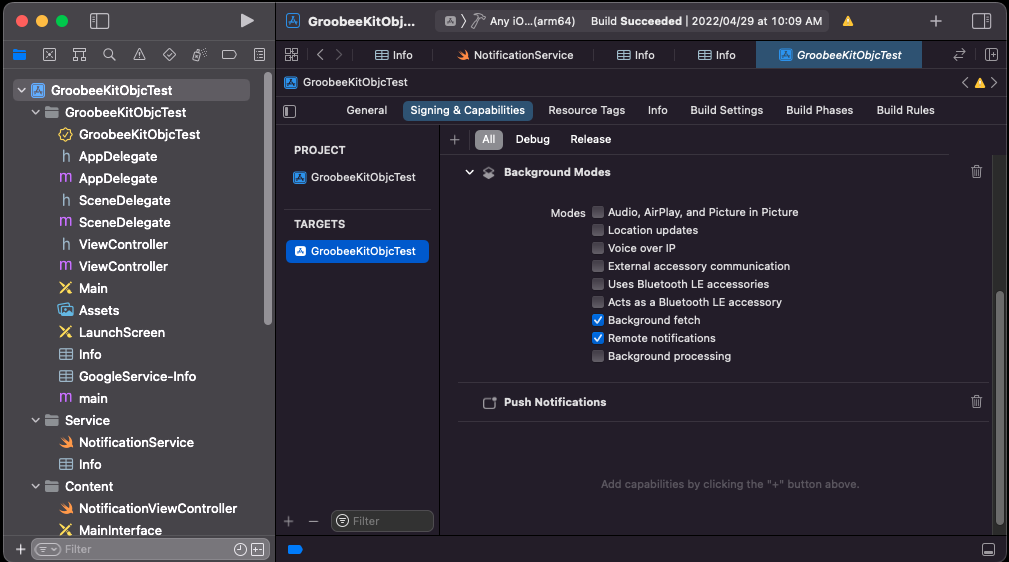
+ Capabilities버튼을 눌러Push Notifications와Background Modes를 추가하고,Background fetch와Remote notifications를 체크하여 활성화합니다.
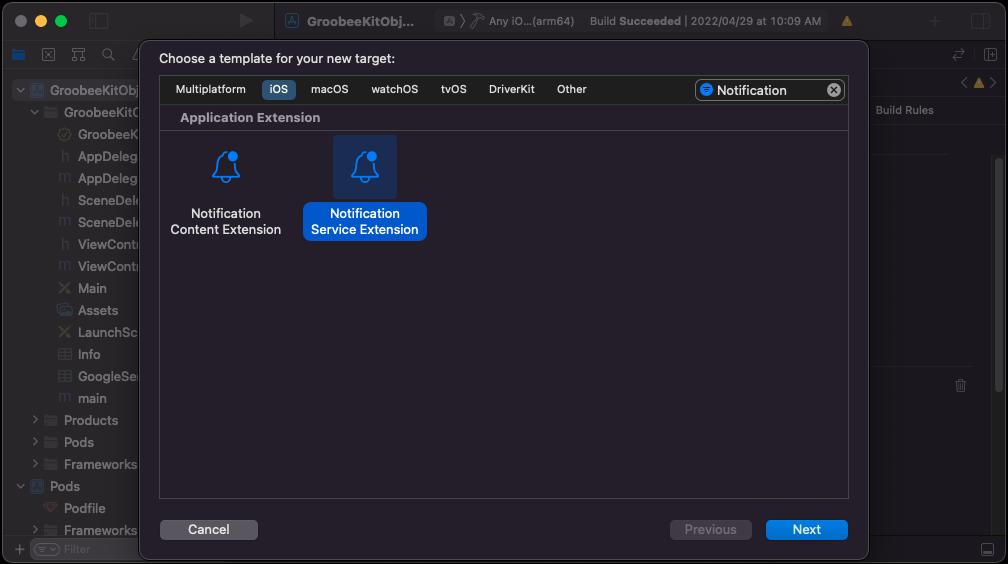
TARGETS하단의+버튼을 클릭합니다.

Notification검색 후Notification Service Extension을 선택하여Next로 진행합니다.
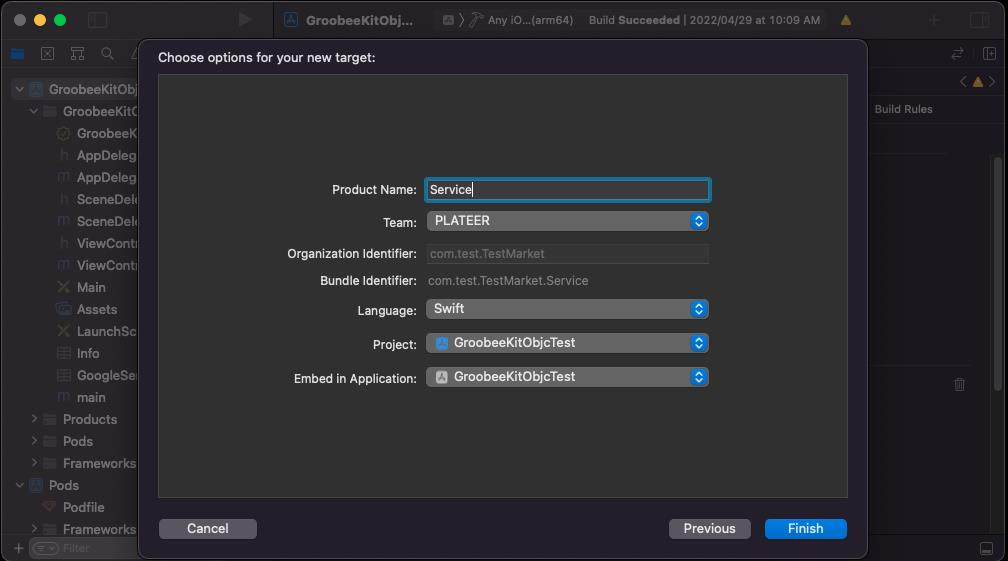
Product Name을Service로 설정하고Language를Swift로 선택한 뒤Finish를 클릭합니다. 이어서Activate를 눌러 Service 스키마를 활성화합니다.
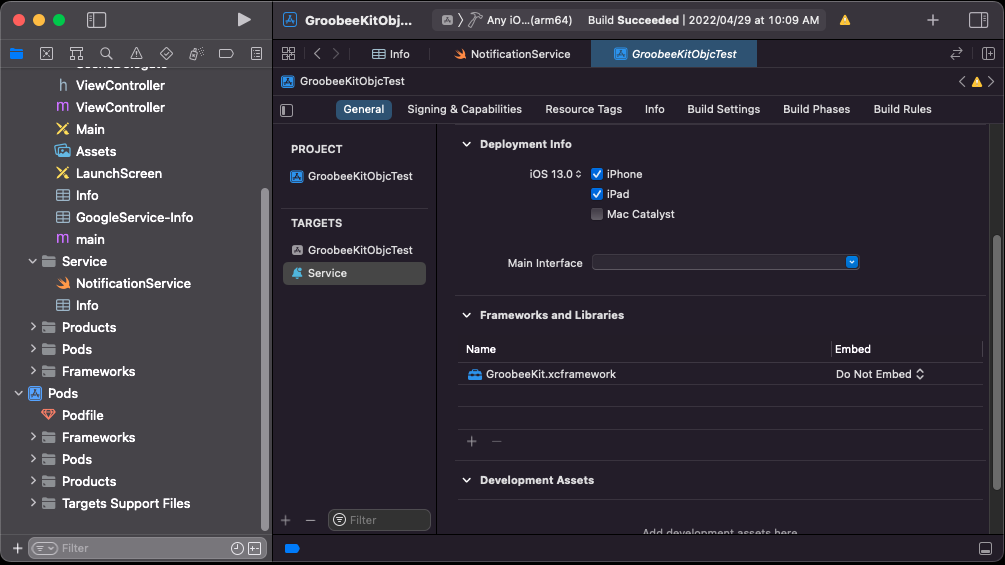
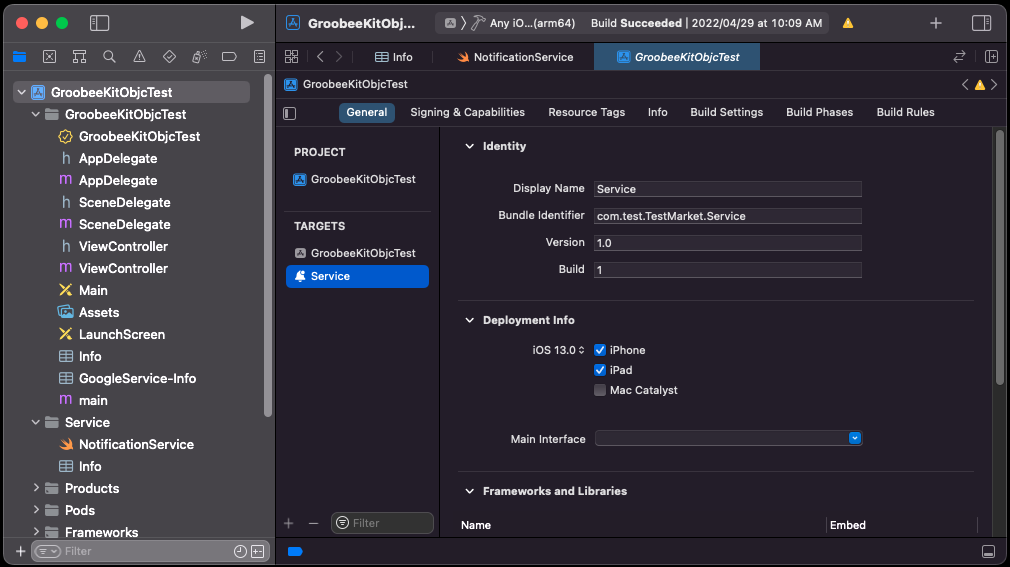
- Service의
Deployment Info에서 iOS 버전을 현재 앱의 Deployment Target과 동일하게 맞추고,Frameworks and Libraries에GroobeeKit.xcframework를 추가한 뒤Embed를Do Not Embed로 설정합니다.
Service -> Info.plist에 아래 항목을 추가합니다.

| Key | Type | Value |
|---|---|---|
App Transport Security Settings |
Dictionary | (1 item) |
Allow Arbitrary Loads |
Boolean | YES |
NotificationService.swift에 아래 코드를 작성합니다.
Firebase 메시징 서비스가 이미 등록되어 있는 경우 GroobeeNotification.getInstance().receiveService()를 통해 request, bestAttemptContent, contentHandler 객체를 그루비에 전달할 수 있습니다.
또한 그루비는 Admin에서 발송한 메시지만 렌더링할 수 있도록 분기 처리 로직이 포함되어 있습니다. 다른 FCM 서비스를 이용 중인 경우에는 else 구간에 코드를 삽입해 메시징 핸들링을 제어할 수 있습니다.
import UserNotifications
import Foundation
import GroobeeKit

class NotificationService: UNNotificationServiceExtension {
    var contentHandler: ((UNNotificationContent) -> Void)?
    var bestAttemptContent: UNMutableNotificationContent?

    override func didReceive(
        _ request: UNNotificationRequest,
        withContentHandler contentHandler: @escaping (UNNotificationContent) -> Void
    ) {
        self.contentHandler = contentHandler
        bestAttemptContent = request.content.mutableCopy() as? UNMutableNotificationContent

        if let bestAttemptContent = bestAttemptContent {
            if GroobeeNotification.getInstance().receiveService(
                request,
                bestAttemptContent,
                withContentHandler: contentHandler
            ) {
                // Groobee Push Message
            } else {
                // Check if message contains a notification payload.
            }
        }
    }

    override func serviceExtensionTimeWillExpire() {
        if let contentHandler = contentHandler, let bestAttemptContent = bestAttemptContent {
            contentHandler(bestAttemptContent)
        }
    }
}
Content 설정 예시
TARGETS하단의+버튼을 클릭합니다.
Notification검색 후Notification Content Extension을 선택하여Next로 진행합니다.
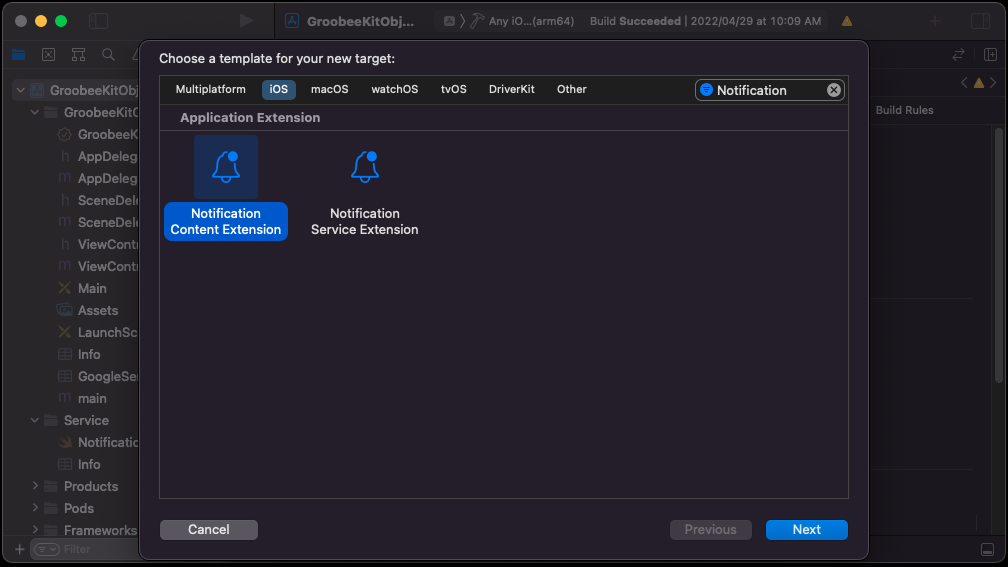
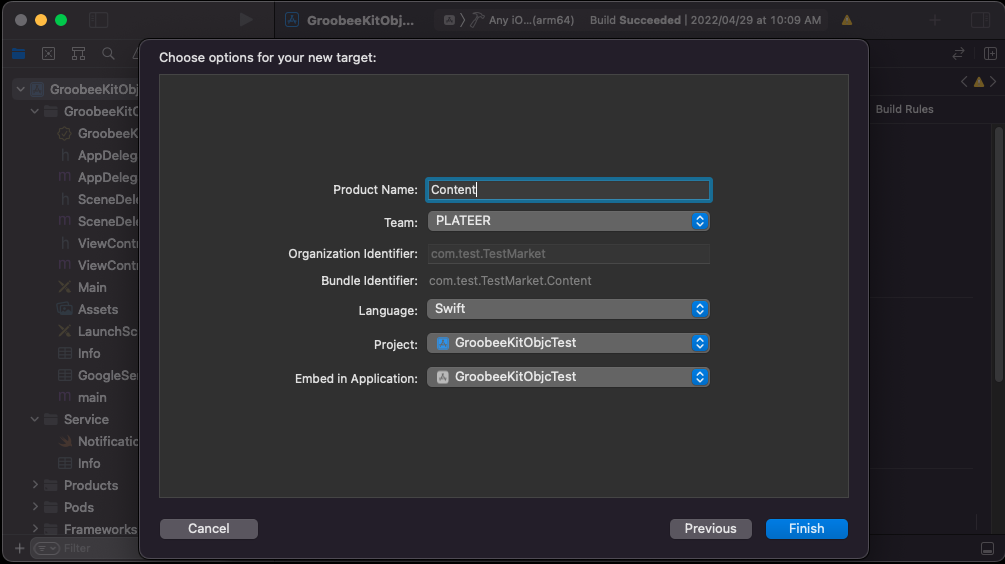
Product Name을Content로 설정하고Language를Swift로 선택한 뒤Finish를 클릭합니다. 이어서Activate를 눌러 Content 스키마를 활성화합니다.
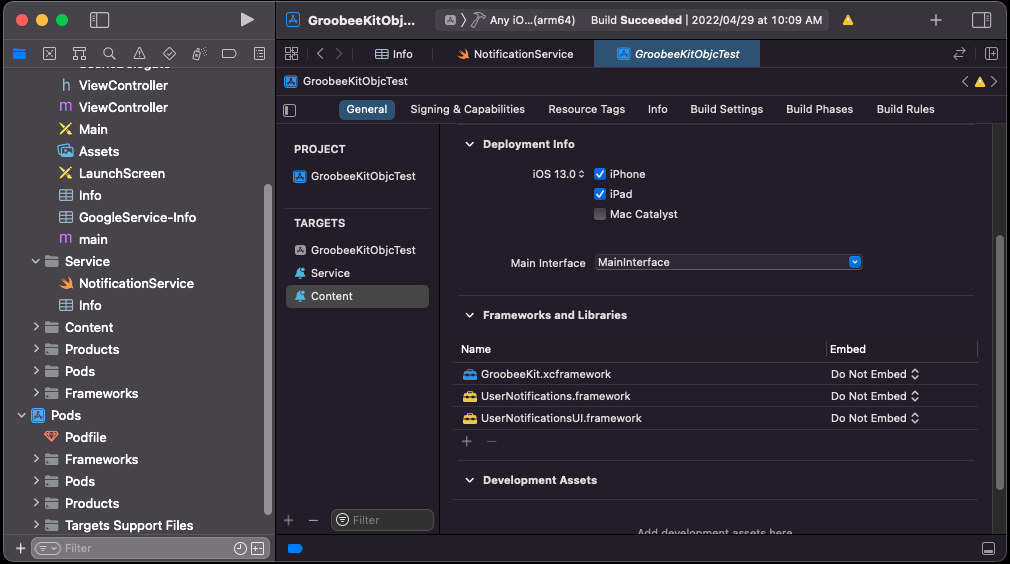
- Content의
Deployment Info에서 iOS 버전을 현재 앱의 Deployment Target과 동일하게 맞추고,Frameworks and Libraries에GroobeeKit.xcframework를 추가한 뒤Embed를Do Not Embed로 설정합니다.
Content -> Info.plist에 아래 항목을 추가합니다.
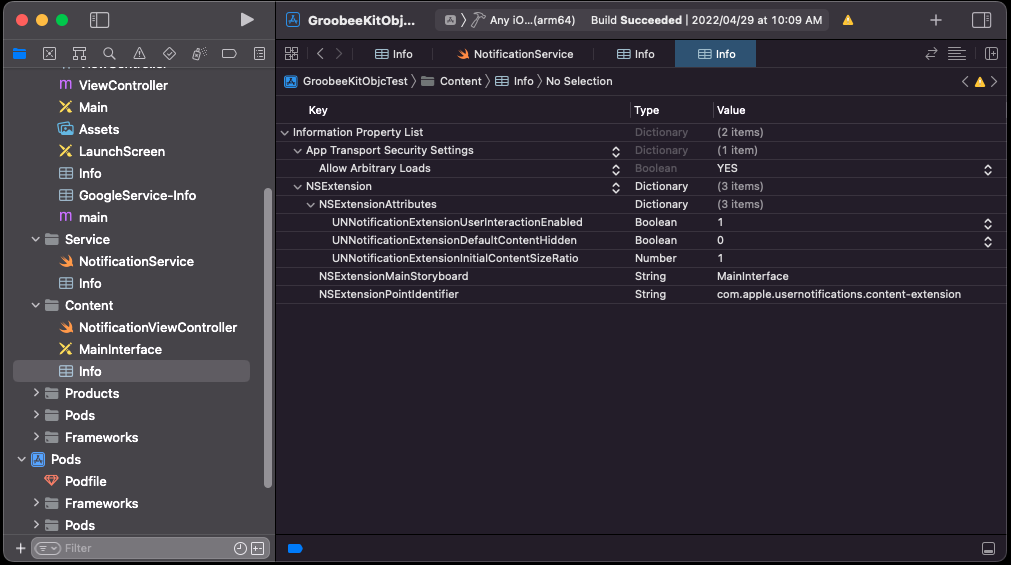
Content Info.plist:
| Key | Type | Value |
|---|---|---|
App Transport Security Settings |
Dictionary | (1 item) |
Allow Arbitrary Loads |
Boolean | YES |
| Key | Type | Value |
|---|---|---|
NSExtensionAttributes |
Dictionary | (3 item) |
UNNotificationExtensionUserInteractionEnabled |
Boolean | 1 |
UNNotificationExtensionDefaultContentHidden |
Boolean | 0 |
UNNotificationExtensionInitialContentSizeRatio |
Number | 1 |
NotificationViewController.swift에 아래 코드를 작성합니다.
Firebase 메시징 서비스가 이미 등록되어 있는 경우 GroobeeNotification.getInstance().receiveContent()를 통해 notification 객체를 그루비에 전달할 수 있습니다.
NotificationService.swift에 추가한 분기 로직과 동일하게 Content에도 분기 코드를 작성합니다.
import UIKit
import UserNotifications
import UserNotificationsUI
import Foundation
import GroobeeKit

class NotificationViewController: UIViewController, UNNotificationContentExtension {
    @IBOutlet var label: UILabel?

    func didReceive(_ notification: UNNotification) {
        if GroobeeNotification.getInstance().receiveContent(notification) {
            // Groobee Push Message
        } else {
            // Check if message contains a notification payload.
        }
    }

    func didReceive(
        _ response: UNNotificationResponse,
        completionHandler completion: @escaping (UNNotificationContentExtensionResponseOption) -> Void
    ) {
        completion(.doNotDismiss)
    }
}