Groobee 스크립트 설치 가이드 - 행동 이력 수집
이 문서는 웹 환경에서 Groobee 스크립트를 실제 서비스에 맞게 설치하기 위한 가이드 중 행동 이력 수집 방법을 기술한 문서입니다.
행동 이력 수집
- Groobee로 사용자별 맞춤 캠페인을 제공하기 위해서는 행동 이력 수집이 필요합니다.
- Groobee에서 기본적으로 제공하는 행동이력 유형은 메인화면, 카테고리, 상품상세정보, 검색, 장바구니, 주문서 작성, 주문완료 페이지 방문 등이 있으며
만약, 추가로 수집하고자 하는 행동이력이 있는 경우에는 커스텀 이벤트 기능을 활용하시면 됩니다.
👉 현재 문서 내 행동 유형 목록에 각 행동유형에 대한 간단한 설명이 나와있습니다.
사전 요구 사항
- (필수) 공통 스크립트가 설치 되어있어야 합니다.
👉 공통 스크립트 설치 가이드 - (권장) 웹 페이지 URL이 등록 되어있어야 합니다.
👉 웹 페이지 경로 등록 가이드
행동 유형 목록
| 행동 이름 | 행동 코드 | 설명 |
|---|---|---|
| 메인 페이지 | MA | 메인 페이지 방문 시 수집 |
| 상품 상세 페이지 | VG | 상품 상세 페이지 방문 시 수집 |
| 장바구니 페이지 | VC | 장바구니 페이지 방문 시 수집 |
| 검색 결과 페이지 | SE | 검색 결과 페이지 방문 시 수집 |
| 주문서 페이지 | OR | 주문서 페이지 방문 시 수집 |
| 주문 완료 페이지 | PU | 주문 완료 시 수집 |
| 카테고리 페이지 | CA | 카테고리 페이지 방문 시 수집 |
| 회원가입 완료 페이지 | MJ | 회원가입 완료 시 수집 |
| 기타 페이지 | LO | 이벤트 등 기타 페이지 방문 시 수집 |
| 커스텀 이벤트 | CE | 개발자가 정의한 특정 행동 |
| 장바구니 담기 이벤트 | AC | 상품을 장바구니에 담았을 때 수집 |
| 장바구니 제거 이벤트 | DC | 장바구니에서 상품을 제거했을 때 수집 |
목차
커스텀 웹 사이트 (Custom)
페이지 내에 공통 스크립트가 custom 유형으로 정상 설치 되어 있다면,
아래와 같은 자바스크립트 함수를 사용 할 수 있습니다.
아래 함수를 타입에 맞는 데이터를 넣어 호출하면 해당 행동 이력이 Groobee로 전송되어 수집됩니다.
커스텀 웹 사이트 행동 이력 수집 방법 보기
메인 페이지 (MA)
- 메인 페이지 방문 이력은 웹 페이지 URL 등록이 되어 있다면 자동으로 수집됩니다.
별도의 코드 삽입이 필요하지 않습니다.
검색 결과 페이지 (SE)
- 검색 결과 페이지 방문 이력은 검색어(keyword)와 함께 호출해주어야 됩니다.
상품 상세 페이지 (VG)
- 상품 상세 페이지 방문 이력은 상품 정보 목록과 함께 호출해주어야 됩니다.
- 상품 정보 목록(goods)의 타입은 Goods[] 이며, 상세한 필드별 설명은 스키마 문서의 Goods 섹션를 참고해주세요.
- 상품 상태(status) 필드는 품절이거나 상품이 판매상태가 아닐 경우에만 "SS" 값을 넣어주시면 됩니다.
정상 판매중인 상품의 경우에는 빈 문자열("")로 전달해주세요.
groobee( "VG", {
  goods : [
    {
      name: "파란색 줄무늬 티셔츠",
      code: "0011",
      amt: 20000,
      prc: 25000,
      salePrc: 20000,
      status : "", // 품절이거나 상품이 판매상태가 아닐 경우 "SS"
      img: "상품 이미지 전체 URL",
      cat: "1234",
      cateNm: "티셔츠",
      catL: "1",
      cateLNm: "의류",
      catM: "12",
      cateMNm: "남성",
      catS: "123",
      cateSNm: "남성상의",
      catD: "1234",
      cateDNm: "티셔츠",
      brand: "P1",
      brandNm: "플래티",
      plan: ['A1', 'A2', 'B1']
    }
  ]
});
장바구니 페이지 (VC)
- 장바구니 페이지 방문 이력은 장바구니 상품 정보 목록과 함께 호출해주어야 됩니다.
- 상품 정보 목록(goods)의 타입은 Goods[] 이며, 상세한 필드별 설명은 스키마 문서의 Goods 섹션를 참고해주세요.
groobee( "VC", {
  goods : [
    {
      name: "파란색 줄무늬 티셔츠",
      code: "0001",
      amt: 10000,
      prc: 15000,
      salePrc: 10000,
      cnt: 1,
      cat: "1234",
      cateNm: "티셔츠",
      catL: "1",
      cateLNm: "의류",
      catM: "12",
      cateMNm: "남성",
      catS: "123",
      cateSNm: "남성상의",
      catD: "1234",
      cateDNm: "티셔츠",
      brand: "P1",
      brandNm: "플래티"
    },
    {
      name: "흰 줄무늬 티셔츠",
      code: "0001",
      amt: 45000,
      prc: 20000,
      salePrc: 15000,
      cnt: 3,
      cat: "1235",
      cateNm: "티셔츠",
      catL: "1",
      cateLNm: "의류",
      catM: "12",
      cateMNm: "남성",
      catS: "123",
      cateSNm: "남성상의",
      catD: "1235",
      cateDNm: "티셔츠",
      brand: "P1",
      brandNm: "플래티"
    }
  ]
});
주문서 작성 페이지 (OR)
- 주문서 작성 페이지 방문 이력은 장바구니 상품 정보 목록과 함께 호출해주어야 됩니다.
- 상품 정보 목록(goods)의 타입은 Goods[] 이며, 상세한 필드별 설명은 스키마 문서의 Goods 섹션를 참고해주세요.
groobee( "OR", {
  goods : [
    {
      name: "파란색 줄무늬 티셔츠",
      code: "0001",
      amt: 10000,
      prc: 15000,
      salePrc: 10000,
      cnt: 1,
      cat: "1234",
      cateNm: "티셔츠",
      catL: "1",
      cateLNm: "의류",
      catM: "12",
      cateMNm: "남성",
      catS: "123",
      cateSNm: "남성상의",
      catD: "1234",
      cateDNm: "티셔츠",
      brand: "P1",
      brandNm: "플래티"
    },
    {
      name: "흰 줄무늬 티셔츠",
      code: "0001",
      amt: 45000,
      prc: 20000,
      salePrc: 15000,
      cnt: 3,
      cat: "1235",
      cateNm: "티셔츠",
      catL: "1",
      cateLNm: "의류",
      catM: "12",
      cateMNm: "남성",
      catS: "123",
      cateSNm: "남성상의",
      catD: "1235",
      cateDNm: "티셔츠",
      brand: "P1",
      brandNm: "플래티"
    }
  ]
});
주문완료 페이지 (PU)
- 주문완료 페이지 방문 이력은 주문번호와 함께 호출해주어야 됩니다.
- 주문번호(orderNo)는 반드시 문자열(String) 타입으로 전달해야 합니다.
- 상품 정보가 있는 경우에는 상품 정보 목록 값을 추가로 전달 할 수 있습니다.
-
상품 정보 목록(goods)의 타입은 Goods[] 이며, 상세한 필드별 설명은 스키마 문서의 Goods 섹션를 참고해주세요.
-
상품 정보가 없는 경우 orderNo만 전달하는 예시
- 상품 정보가 있는 경우 orderNo와 Goods[]를 함께 전달하는 예시
groobee( "PU", {
  orderNo : "PU0102030405",
  goods : [
    {
      name: "파란색 줄무늬 티셔츠",
      code: "0001",
      amt: 10000,
      prc: 15000,
      salePrc: 10000,
      cnt: 1,
      cat: "1234",
      cateNm: "티셔츠",
      catL: "1",
      cateLNm: "의류",
      catM: "12",
      cateMNm: "남성",
      catS: "123",
      cateSNm: "남성상의",
      catD: "1234",
      cateDNm: "티셔츠",
      brand: "P1",
      brandNm: "플래티"
    },
    {
      name: "흰 줄무늬 티셔츠",
      code: "0001",
      amt: 45000,
      prc: 20000,
      salePrc: 15000,
      cnt: 3,
      cat: "1235",
      cateNm: "티셔츠",
      catL: "1",
      cateLNm: "의류",
      catM: "12",
      cateMNm: "남성",
      catS: "123",
      cateSNm: "남성상의",
      catD: "1235",
      cateDNm: "티셔츠",
      brand: "P1",
      brandNm: "플래티"
    }
  ]
});
카테고리 페이지 (CA)
- 카테고리 페이지 방문 이력은 카테고리 정보와 함께 호출해주어야 됩니다.
- 카테고리 정보(category)의 타입은 Category 이며, 상세한 필드별 설명은 스키마 문서의 Category 섹션를 참고해주세요.
groobee( "CA", {
  category : {
    cateCd: "1234",
    cateNm: "티셔츠",
    catL: "1",
    cateLNm: "의류",
    catM: "12",
    cateMNm: "남성",
    catS: "123",
    cateSNm: "남성상의",
    catD: "1234",
    cateDNm: "티셔츠"
  }
});
장바구니 담기 (AC)
- 장바구니 담기 이벤트는 장바구니에 담긴 상품 정보와 함께 호출해주어야 됩니다.
- 상품 정보(goods)의 타입은 Goods 이며, 상세한 필드별 설명은 스키마 문서의 Goods 섹션를 참고해주세요.
groobee( "AC", {
  goods : [
    {
      name: "파란색 줄무늬 티셔츠",
      code: "0001",
      amt: 10000,
      prc: 15000,
      salePrc: 10000,
      cnt: 1,
      cat: "1234",
      cateNm: "티셔츠",
      catL: "1",
      cateLNm: "의류",
      catM: "12",
      cateMNm: "남성",
      catS: "123",
      cateSNm: "남성상의",
      catD: "1234",
      cateDNm: "티셔츠",
      brand: "P1",
      brandNm: "플래티"
    },
    {
      name: "흰 줄무늬 티셔츠",
      code: "0001",
      amt: 45000,
      prc: 20000,
      salePrc: 15000,
      cnt: 3,
      cat: "1235",
      cateNm: "티셔츠",
      catL: "1",
      cateLNm: "의류",
      catM: "12",
      cateMNm: "남성",
      catS: "123",
      cateSNm: "남성상의",
      catD: "1235",
      cateDNm: "티셔츠",
      brand: "P1",
      brandNm: "플래티"
    }
  ]
});
장바구니 제거 (DC)
- 장바구니 제거 이벤트는 장바구니에서 제거된 상품 정보와 함께 호출해주어야 됩니다.
- 상품 정보(goods)의 타입은 Goods 이며, 상세한 필드별 설명은 스키마 문서의 Goods 섹션를 참고해주세요.
- 상품수(cnt) 필드는 장바구니에서 제거된 수량을 의미합니다.
- 예) 장바구니에 3개 담긴 상품을 모두 제거한 경우 cnt: 3 으로 전달
SPA 환경 (React, Vue 등)
페이지 내에 공통 스크립트가 custom spa유형으로 정상 설치 되어 있다면,
아래와 같은 자바스크립트 함수를 사용 할 수 있습니다.
아래 함수를 타입에 맞는 데이터를 넣어 호출하면 해당 행동 이력이 Groobee로 전송되어 수집됩니다.
중요
SPA 모드로 공통 스크립트를 설치한 경우,
groobee.start()가 호출되지 않으면, groobee.action() 함수를 사용할 수 없습니다.
groobee.start() 함수를 호출하여 초기화 후 사용해야 합니다.
공통 스크립트 설치의 SPA 환경 섹션 문서를 참고해주세요.
SPA 웹 사이트 행동 이력 수집 방법 보기
메인 페이지 (MA)
- 메인 페이지 방문 이력은 웹 페이지 URL 등록이 되어 있다면 자동으로 수집됩니다.
별도의 코드 삽입이 필요하지 않습니다.
검색 결과 페이지 (SE)
- 검색 결과 페이지 방문 이력은 검색어(keyword)와 함께 호출해주어야 됩니다.
상품 상세 페이지 (VG)
- 상품 상세 페이지 방문 이력은 상품 정보 목록과 함께 호출해주어야 됩니다.
- 상품 정보 목록(goods)의 타입은 Goods[] 이며, 상세한 필드별 설명은 스키마 문서의 Goods 섹션를 참고해주세요.
- 상품 상태(status) 필드는 품절이거나 상품이 판매상태가 아닐 경우에만 "SS" 값을 넣어주시면 됩니다.
정상 판매중인 상품의 경우에는 빈 문자열("")로 전달해주세요.
groobee.action( "VG", {
  goods : [
    {
      name: "파란색 줄무늬 티셔츠",
      code: "0011",
      amt: 20000,
      prc: 25000,
      salePrc: 20000,
      status : "", // 품절이거나 상품이 판매상태가 아닐 경우 "SS"
      img: "상품 이미지 전체 URL",
      cat: "1234",
      cateNm: "티셔츠",
      catL: "1",
      cateLNm: "의류",
      catM: "12",
      cateMNm: "남성",
      catS: "123",
      cateSNm: "남성상의",
      catD: "1234",
      cateDNm: "티셔츠",
      brand: "P1",
      brandNm: "플래티",
      plan: ['A1', 'A2', 'B1']
    }
  ]
});
장바구니 페이지 (VC)
- 장바구니 페이지 방문 이력은 장바구니 상품 정보 목록과 함께 호출해주어야 됩니다.
- 상품 정보 목록(goods)의 타입은 Goods[] 이며, 상세한 필드별 설명은 스키마 문서의 Goods 섹션를 참고해주세요.
groobee.action( "VC", {
  goods : [
    {
      name: "파란색 줄무늬 티셔츠",
      code: "0001",
      amt: 10000,
      prc: 15000,
      salePrc: 10000,
      cnt: 1,
      cat: "1234",
      cateNm: "티셔츠",
      catL: "1",
      cateLNm: "의류",
      catM: "12",
      cateMNm: "남성",
      catS: "123",
      cateSNm: "남성상의",
      catD: "1234",
      cateDNm: "티셔츠",
      brand: "P1",
      brandNm: "플래티"
    },
    {
      name: "흰 줄무늬 티셔츠",
      code: "0001",
      amt: 45000,
      prc: 20000,
      salePrc: 15000,
      cnt: 3,
      cat: "1235",
      cateNm: "티셔츠",
      catL: "1",
      cateLNm: "의류",
      catM: "12",
      cateMNm: "남성",
      catS: "123",
      cateSNm: "남성상의",
      catD: "1235",
      cateDNm: "티셔츠",
      brand: "P1",
      brandNm: "플래티"
    }
  ]
});
주문서 작성 페이지 (OR)
- 주문서 작성 페이지 방문 이력은 장바구니 상품 정보 목록과 함께 호출해주어야 됩니다.
- 상품 정보 목록(goods)의 타입은 Goods[] 이며, 상세한 필드별 설명은 스키마 문서의 Goods 섹션를 참고해주세요.
groobee.action( "OR", {
  goods : [
    {
      name: "파란색 줄무늬 티셔츠",
      code: "0001",
      amt: 10000,
      prc: 15000,
      salePrc: 10000,
      cnt: 1,
      cat: "1234",
      cateNm: "티셔츠",
      catL: "1",
      cateLNm: "의류",
      catM: "12",
      cateMNm: "남성",
      catS: "123",
      cateSNm: "남성상의",
      catD: "1234",
      cateDNm: "티셔츠",
      brand: "P1",
      brandNm: "플래티"
    },
    {
      name: "흰 줄무늬 티셔츠",
      code: "0001",
      amt: 45000,
      prc: 20000,
      salePrc: 15000,
      cnt: 3,
      cat: "1235",
      cateNm: "티셔츠",
      catL: "1",
      cateLNm: "의류",
      catM: "12",
      cateMNm: "남성",
      catS: "123",
      cateSNm: "남성상의",
      catD: "1235",
      cateDNm: "티셔츠",
      brand: "P1",
      brandNm: "플래티"
    }
  ]
});
주문완료 페이지 (PU)
- 주문완료 페이지 방문 이력은 주문번호와 함께 호출해주어야 됩니다.
- 주문번호(orderNo)는 반드시 문자열(String) 타입으로 전달해야 합니다.
- 상품 정보가 있는 경우에는 상품 정보 목록 값을 추가로 전달 할 수 있습니다.
-
상품 정보 목록(goods)의 타입은 Goods[] 이며, 상세한 필드별 설명은 스키마 문서의 Goods 섹션를 참고해주세요.
-
상품 정보가 없는 경우 orderNo만 전달하는 예시
- 상품 정보가 있는 경우 orderNo와 Goods[]를 함께 전달하는 예시
groobee.action( "PU", {
  orderNo : "PU0102030405",
  goods : [
    {
      name: "파란색 줄무늬 티셔츠",
      code: "0001",
      amt: 10000,
      prc: 15000,
      salePrc: 10000,
      cnt: 1,
      cat: "1234",
      cateNm: "티셔츠",
      catL: "1",
      cateLNm: "의류",
      catM: "12",
      cateMNm: "남성",
      catS: "123",
      cateSNm: "남성상의",
      catD: "1234",
      cateDNm: "티셔츠",
      brand: "P1",
      brandNm: "플래티"
    },
    {
      name: "흰 줄무늬 티셔츠",
      code: "0001",
      amt: 45000,
      prc: 20000,
      salePrc: 15000,
      cnt: 3,
      cat: "1235",
      cateNm: "티셔츠",
      catL: "1",
      cateLNm: "의류",
      catM: "12",
      cateMNm: "남성",
      catS: "123",
      cateSNm: "남성상의",
      catD: "1235",
      cateDNm: "티셔츠",
      brand: "P1",
      brandNm: "플래티"
    }
  ]
});
카테고리 페이지 (CA)
- 카테고리 페이지 방문 이력은 카테고리 정보와 함께 호출해주어야 됩니다.
- 카테고리 정보(category)의 타입은 Category 이며, 상세한 필드별 설명은 스키마 문서의 Category 섹션를 참고해주세요.
groobee.action( "CA", {
  category : {
    cateCd: "1234",
    cateNm: "티셔츠",
    catL: "1",
    cateLNm: "의류",
    catM: "12",
    cateMNm: "남성",
    catS: "123",
    cateSNm: "남성상의",
    catD: "1234",
    cateDNm: "티셔츠"
  }
});
장바구니 담기 (AC)
- 장바구니 담기 이벤트는 장바구니에 담긴 상품 정보와 함께 호출해주어야 됩니다.
- 상품 정보(goods)의 타입은 Goods 이며, 상세한 필드별 설명은 스키마 문서의 Goods 섹션를 참고해주세요.
groobee.action( "AC", {
  goods : [
    {
      name: "파란색 줄무늬 티셔츠",
      code: "0001",
      amt: 10000,
      prc: 15000,
      salePrc: 10000,
      cnt: 1,
      cat: "1234",
      cateNm: "티셔츠",
      catL: "1",
      cateLNm: "의류",
      catM: "12",
      cateMNm: "남성",
      catS: "123",
      cateSNm: "남성상의",
      catD: "1234",
      cateDNm: "티셔츠",
      brand: "P1",
      brandNm: "플래티"
    },
    {
      name: "흰 줄무늬 티셔츠",
      code: "0001",
      amt: 45000,
      prc: 20000,
      salePrc: 15000,
      cnt: 3,
      cat: "1235",
      cateNm: "티셔츠",
      catL: "1",
      cateLNm: "의류",
      catM: "12",
      cateMNm: "남성",
      catS: "123",
      cateSNm: "남성상의",
      catD: "1235",
      cateDNm: "티셔츠",
      brand: "P1",
      brandNm: "플래티"
    }
  ]
});
장바구니 제거 (DC)
- 장바구니 제거 이벤트는 장바구니에서 제거된 상품 정보와 함께 호출해주어야 됩니다.
- 상품 정보(goods)의 타입은 Goods 이며, 상세한 필드별 설명은 스키마 문서의 Goods 섹션를 참고해주세요.
- 상품수(cnt) 필드는 장바구니에서 제거된 수량을 의미합니다.
- 예) 장바구니에 3개 담긴 상품을 모두 제거한 경우 cnt: 3 으로 전달
Cafe24
페이지 내에 공통 스크립트가 cafe24유형으로 정상 설치 되어 있다면, 스마트 디자인 편집기에서 아래 스크립트들을 삽입하여 행동 이력을 수집할 수 있습니다.
CAFE24 웹 사이트 행동 이력 수집 방법 보기
메인 페이지 (MA)
- 메인 페이지 방문 이력은 웹 페이지 URL 등록이 되어 있다면 자동으로 수집됩니다.
별도의 코드 삽입이 필요하지 않습니다.
검색 결과 페이지 (SE)
- 검색 페이지 방문 이력은 웹 페이지 URL 등록이 되어 있다면 자동으로 수집됩니다.
별도의 코드 삽입이 필요하지 않습니다.
상품 상세 페이지 (VG)
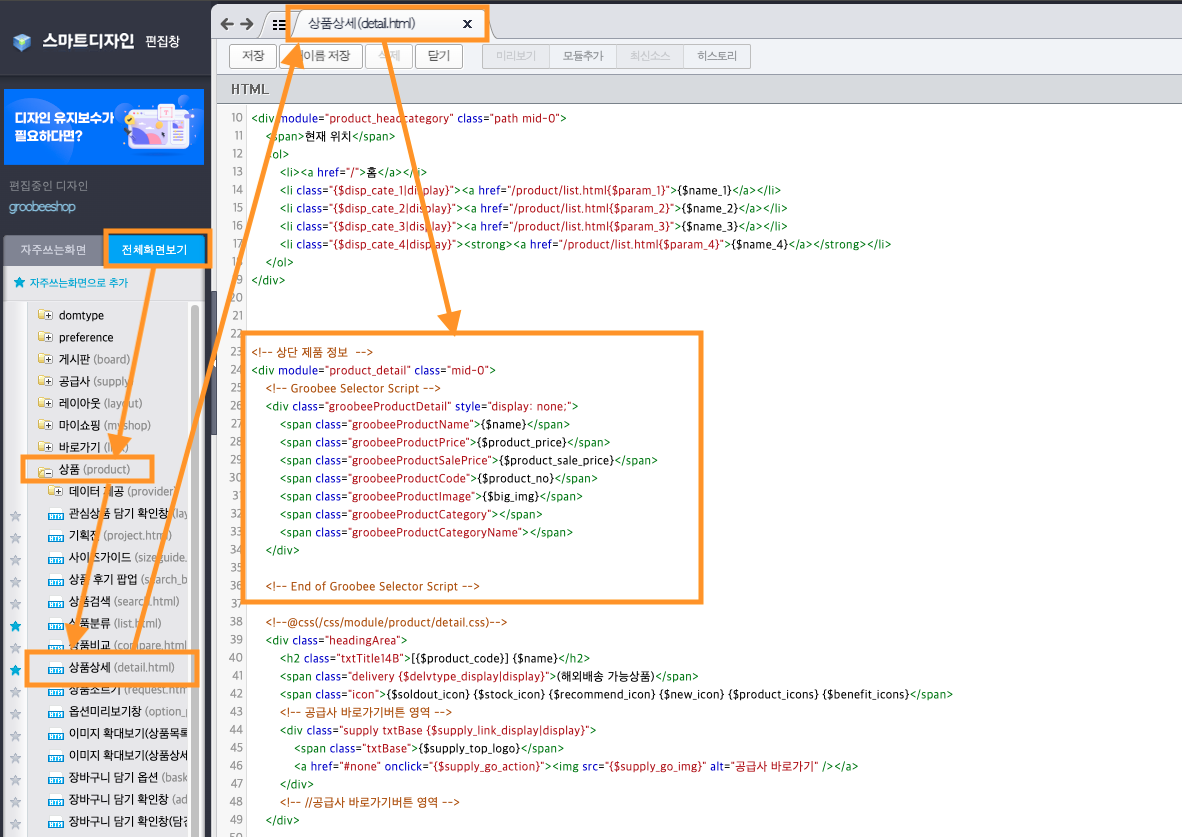
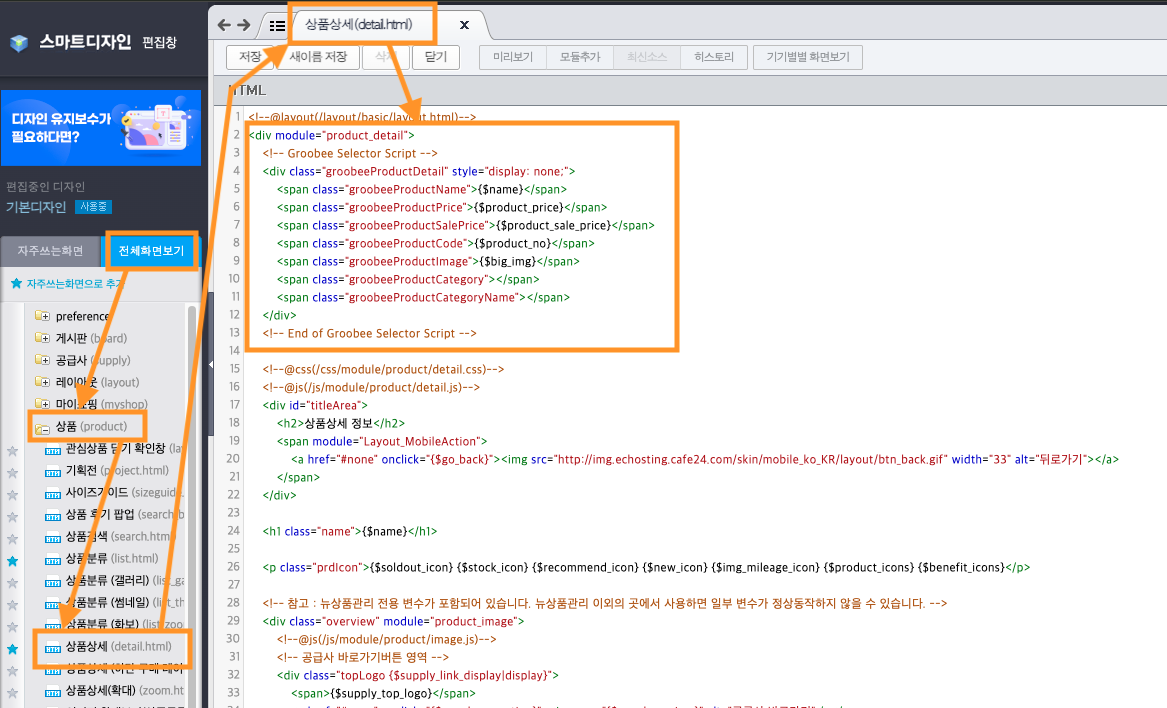
- 상품 > 상품 상세 페이지 <div module="product_detail"> 바로 하단에 아래 스크립트를 삽입합니다.
PC
<!-- Groobee Selector Script -->
<div class="groobeeProductDetail" style="display: none;">
<span class="groobeeProductName">{$name}</span>
<span class="groobeeProductPrice">{$product_price}</span>
<span class="groobeeProductSalePrice">{$product_sale_price}</span>
<span class="groobeeProductCode">{$product_no}</span>
<span class="groobeeProductImage">{$medium_img}</span>
<span class="groobeeProductCategory"></span>
<span class="groobeeProductCategoryName"></span>
<span class="groobeeProductStatus">{$soldout_icon}</span>
</div>
<!-- End of Groobee Selector Script -->
모바일
상품 상세 이력 수집을 위한 스크립트 설치 위치 및 예시
<!-- Groobee Selector Script -->
<div class="groobeeProductDetail" style="display: none;">
<span class="groobeeProductName">{$name}</span>
<span class="groobeeProductPrice">{$product_price}</span>
<span class="groobeeProductSalePrice">{$txt_product_price_mobile}</span>
<span class="groobeeProductCode">{$product_no}</span>
<span class="groobeeProductImage">{$medium_img}</span>
<span class="groobeeProductCategory"></span>
<span class="groobeeProductCategoryName"></span>
<span class="groobeeProductStatus">{$soldout_icon}</span>
</div>
<!-- End of Groobee Selector Script -->
장바구니 페이지 (VC)
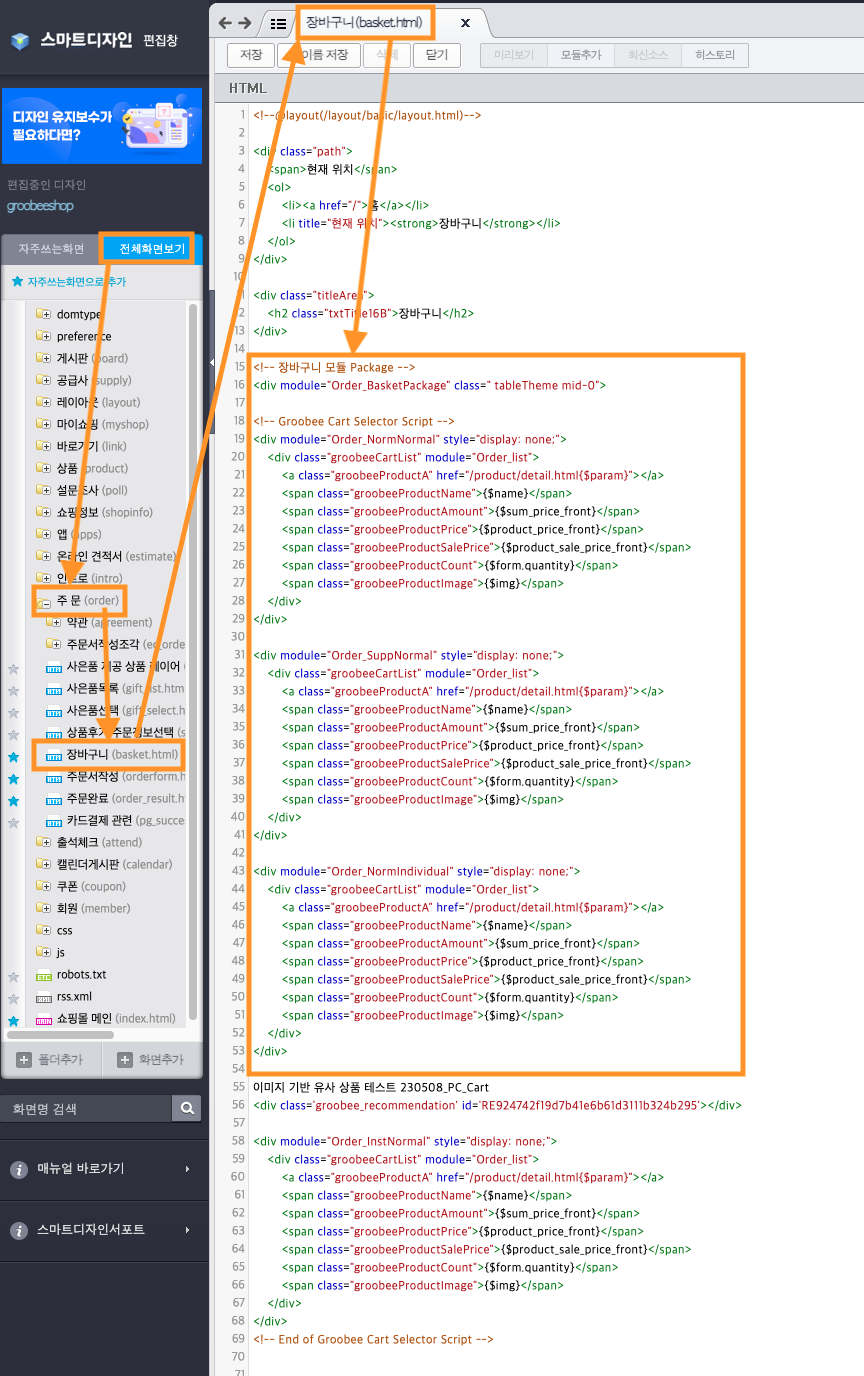
- 주문 > 장바구니 페이지 <div module="Order_BasketPackage"> 바로 하단에 아래 스크립트를 삽입합니다.
장바구니 이력 수집을 위한 스크립트 설치 위치 및 예시<!-- Groobee Cart Selector Script --> <div module="Order_NormNormal" style="display: none;"> <div class="groobeeCartList" module="Order_list"> <a class="groobeeProductA" href="/product/detail.html{$param}"></a> <span class="groobeeProductName">{$name}</span> <span class="groobeeProductAmount">{$sum_price_front}</span> <span class="groobeeProductPrice">{$product_price_front}</span> <span class="groobeeProductSalePrice">{$product_sale_price_front}</span> <span class="groobeeProductCount">{$quantity}</span> <span class="groobeeProductImage">{$img}</span> </div> </div> <div module="Order_SuppNormal" style="display: none;"> <div class="groobeeCartList" module="Order_list"> <a class="groobeeProductA" href="/product/detail.html{$param}"></a> <span class="groobeeProductName">{$name}</span> <span class="groobeeProductAmount">{$sum_price_front}</span> <span class="groobeeProductPrice">{$product_price_front}</span> <span class="groobeeProductSalePrice">{$product_sale_price_front}</span> <span class="groobeeProductCount">{$quantity}</span> <span class="groobeeProductImage">{$img}</span> </div> </div> <div module="Order_NormIndividual" style="display: none;"> <div class="groobeeCartList" module="Order_list"> <a class="groobeeProductA" href="/product/detail.html{$param}"></a> <span class="groobeeProductName">{$name}</span> <span class="groobeeProductAmount">{$sum_price_front}</span> <span class="groobeeProductPrice">{$product_price_front}</span> <span class="groobeeProductSalePrice">{$product_sale_price_front}</span> <span class="groobeeProductCount">{$quantity}</span> <span class="groobeeProductImage">{$img}</span> </div> </div> <div module="Order_InstNormal" style="display: none;"> <div class="groobeeCartList" module="Order_list"> <a class="groobeeProductA" href="/product/detail.html{$param}"></a> <span class="groobeeProductName">{$name}</span> <span class="groobeeProductAmount">{$sum_price_front}</span> <span class="groobeeProductPrice">{$product_price_front}</span> <span class="groobeeProductSalePrice">{$product_sale_price_front}</span> <span class="groobeeProductCount">{$quantity}</span> <span class="groobeeProductImage">{$img}</span> </div> </div> <!-- End of Groobee Cart Selector Script --> <!-- 해외배송을 사용하는 사이트만 삽입 --> <div module="Order_NormOversea" style="display: none;"> <div class="groobeeCartList" module="Order_list"> <a class="groobeeProductA" href="/product/detail.html{$param}"></a> <span class="groobeeProductName">{$name}</span> <span class="groobeeProductAmount">{$sum_price_front}</span> <span class="groobeeProductPrice">{$product_price_front}</span> <span class="groobeeProductSalePrice">{$product_sale_price_front}</span> <span class="groobeeProductCount">{$quantity}</span> <span class="groobeeProductImage">{$img}</span> </div> </div> <!-- End of Groobee Cart Selector Script -->
주문서 작성 페이지 (OR)
- 주문 > 주문서 작성 페이지 <div module="Order_form"> 바로 하단에 아래 스크립트를 삽입합니다.
주문서 작성 이력 수집을 위한 스크립트 설치 위치 및 예시
<!-- Groobee Order Selector Script -->
<div class="groobeeOrderList" module="Order_normallist" style="display: none;">
<a class="groobeeProductA" href="/product/detail.html{$param}"></a>
<span class="groobeeProductName">{$product_name_link}</span>
<span class="groobeeProductAmount">{$product_total_price_front}</span>
<span class="groobeeProductPrice">{$product_price_front}</span>
<span class="groobeeProductSalePrice">{$product_sale_price_front}</span>
<span class="groobeeProductCount">{$product_quantity_text}</span>
<span class="groobeeProductImage">{$product_image}</span>
</div>
<div class="groobeeOrderList" module="Order_supplierlist" style="display: none;">
<a class="groobeeProductA" href="/product/detail.html{$param}"></a>
<span class="groobeeProductName">{$product_name_link}</span>
<span class="groobeeProductAmount">{$product_total_price_front}</span>
<span class="groobeeProductPrice">{$product_price_front}</span>
<span class="groobeeProductSalePrice">{$product_sale_price_front}</span>
<span class="groobeeProductCount">{$product_quantity_text}</span>
<span class="groobeeProductImage">{$product_image}</span>
</div>
<div class="groobeeOrderList" module="Order_individuallist" style="display: none;">
<a class="groobeeProductA" href="/product/detail.html{$param}"></a>
<span class="groobeeProductName">{$product_name_link}</span>
<span class="groobeeProductAmount">{$product_total_price_front}</span>
<span class="groobeeProductPrice">{$product_price_front}</span>
<span class="groobeeProductSalePrice">{$product_sale_price_front}</span>
<span class="groobeeProductCount">{$product_quantity_text}</span>
<span class="groobeeProductImage">{$product_image}</span>
</div>
<!-- End of Groobee Order Selector Script -->
<!-- 해외배송을 사용하는 사이트만 삽입 -->
<div class="groobeeOrderList" module="Order_oversealist" style="display: none;">
<a class="groobeeProductA" href="/product/detail.html{$param}"></a>
<span class="groobeeProductName">{$product_name_link}</span>
<span class="groobeeProductAmount">{$product_total_price_front}</span>
<span class="groobeeProductPrice">{$product_price_front}</span>
<span class="groobeeProductSalePrice">{$product_sale_price_front}</span>
<span class="groobeeProductCount">{$product_quantity_text}</span>
<span class="groobeeProductImage">{$product_image}</span>
</div>
<!-- End of Groobee Order Selector Script -->
특이사항
모바일 간편(원터치) 주문서 이력은 수집 할 수 없습니다.
주문완료 페이지 (PU)
- 주문 완료 이력은 웹 페이지 URL 등록이 되어 있다면 자동으로 수집됩니다.
별도의 코드 삽입이 필요하지 않습니다.
특이사항
모바일 간편(원터치) 주문 이력은 수집 할 수 없습니다.
카테고리 페이지 (CA)
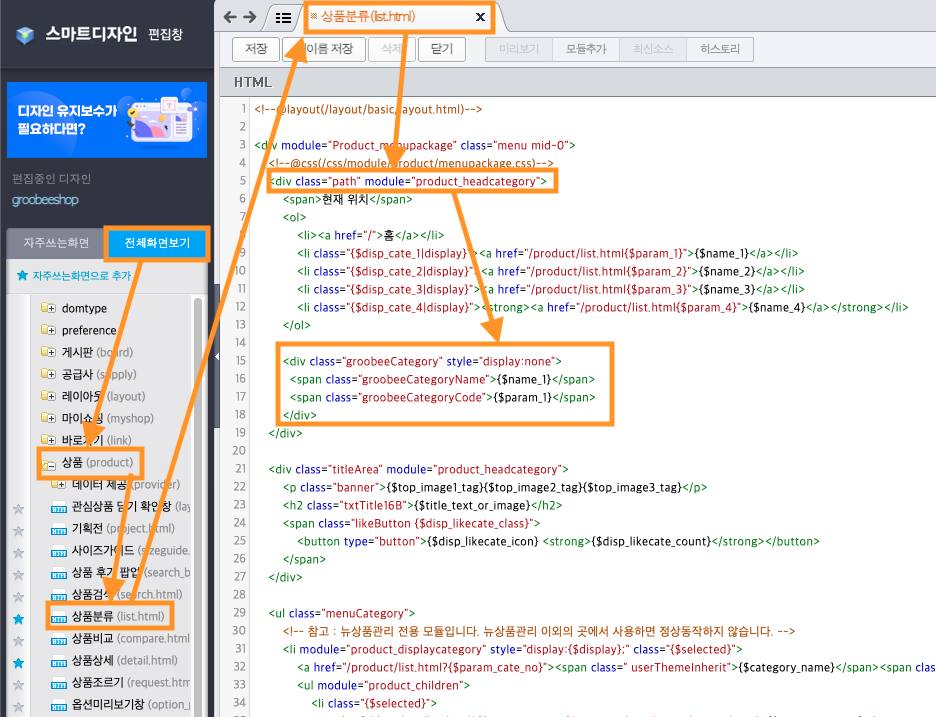
- 상품 > 상품 분류 페이지 <div module="product_headcategory"> 하단에 아래 스크립트를 삽입합니다.
cafe24 유형은 현재 대카테고리 정보만 수집이 가능하며, 중/소/세부 카테고리 정보는 수집이 불가능합니다.
카테고리 이력 수집을 위한 스크립트 설치 위치 및 예시
고도몰
페이지 내에 공통 스크립트가 고도몰 유형 (godo5, godo5_m)으로 정상 설치 되어 있다면, 아래 스크립트들을 삽입하여 행동 이력을 수집할 수 있습니다.
고도몰 웹 사이트 행동 이력 수집 방법 보기
메인 페이지 (MA)
- 메인 페이지 방문 이력은 웹 페이지 URL 등록이 되어 있다면 자동으로 수집됩니다.
별도의 코드 삽입이 필요하지 않습니다.
검색 결과 페이지 (SE)
- 검색 페이지 방문 이력은 웹 페이지 URL 등록이 되어 있다면 자동으로 수집됩니다.
별도의 코드 삽입이 필요하지 않습니다.
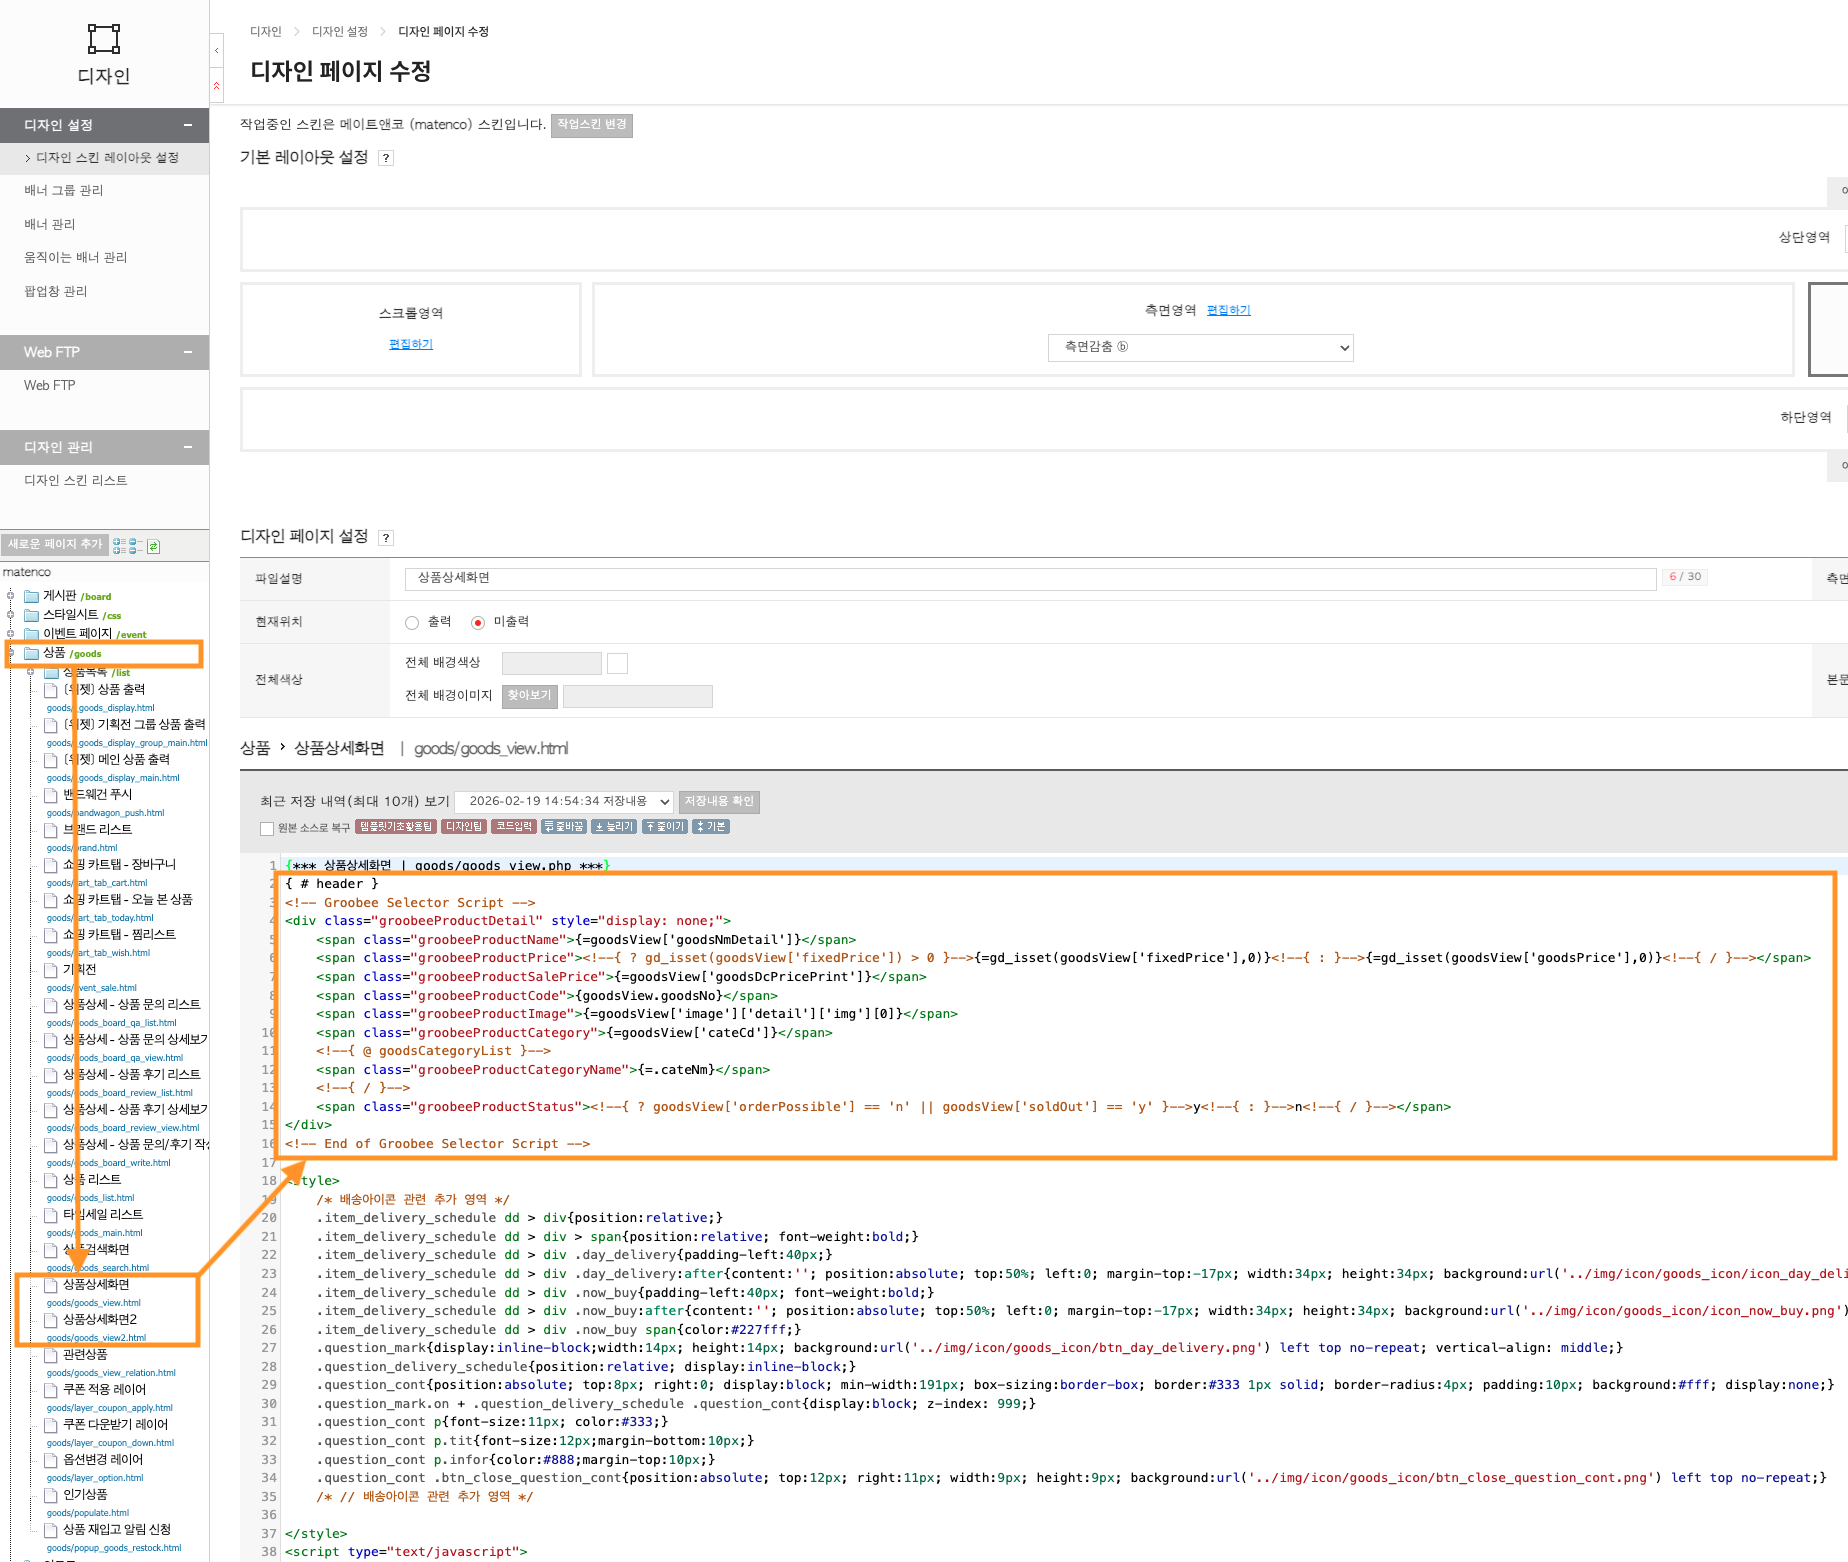
상품 상세 페이지 (VG)
- 상품 > 상품상세 페이지 > { # header } 하단에 아래 스크립트를 삽입합니다.
상품 상세 이력 수집을 위한 스크립트 설치 위치 및 예시
<!-- Groobee Selector Script -->
<div class="groobeeProductDetail" style="display: none;">
    <span class="groobeeProductName">{=goodsView['goodsNmDetail']}</span>
    <span class="groobeeProductPrice"><!--{ ? gd_isset(goodsView['fixedPrice']) > 0 }-->{=gd_isset(goodsView['fixedPrice'],0)}<!--{ : }-->{=gd_isset(goodsView['goodsPrice'],0)}<!--{ / }--></span>
    <span class="groobeeProductSalePrice">{=goodsView['goodsDcPricePrint']}</span>
    <span class="groobeeProductCode">{goodsView.goodsNo}</span>
    <span class="groobeeProductImage">{=goodsView['image']['detail']['img'][0]}</span>
    <span class="groobeeProductCategory">{=goodsView['cateCd']}</span>
    <!--{ @ goodsCategoryList }-->
    <span class="groobeeProductCategoryName">{=.cateNm}</span>
    <!--{ / }-->
    <span class="groobeeProductStatus"><!--{ ? goodsView['orderPossible'] == 'n' || goodsView['soldOut'] == 'y' }-->y<!--{ : }-->n<!--{ / }--></span>
</div>
<!-- End of Groobee Selector Script -->
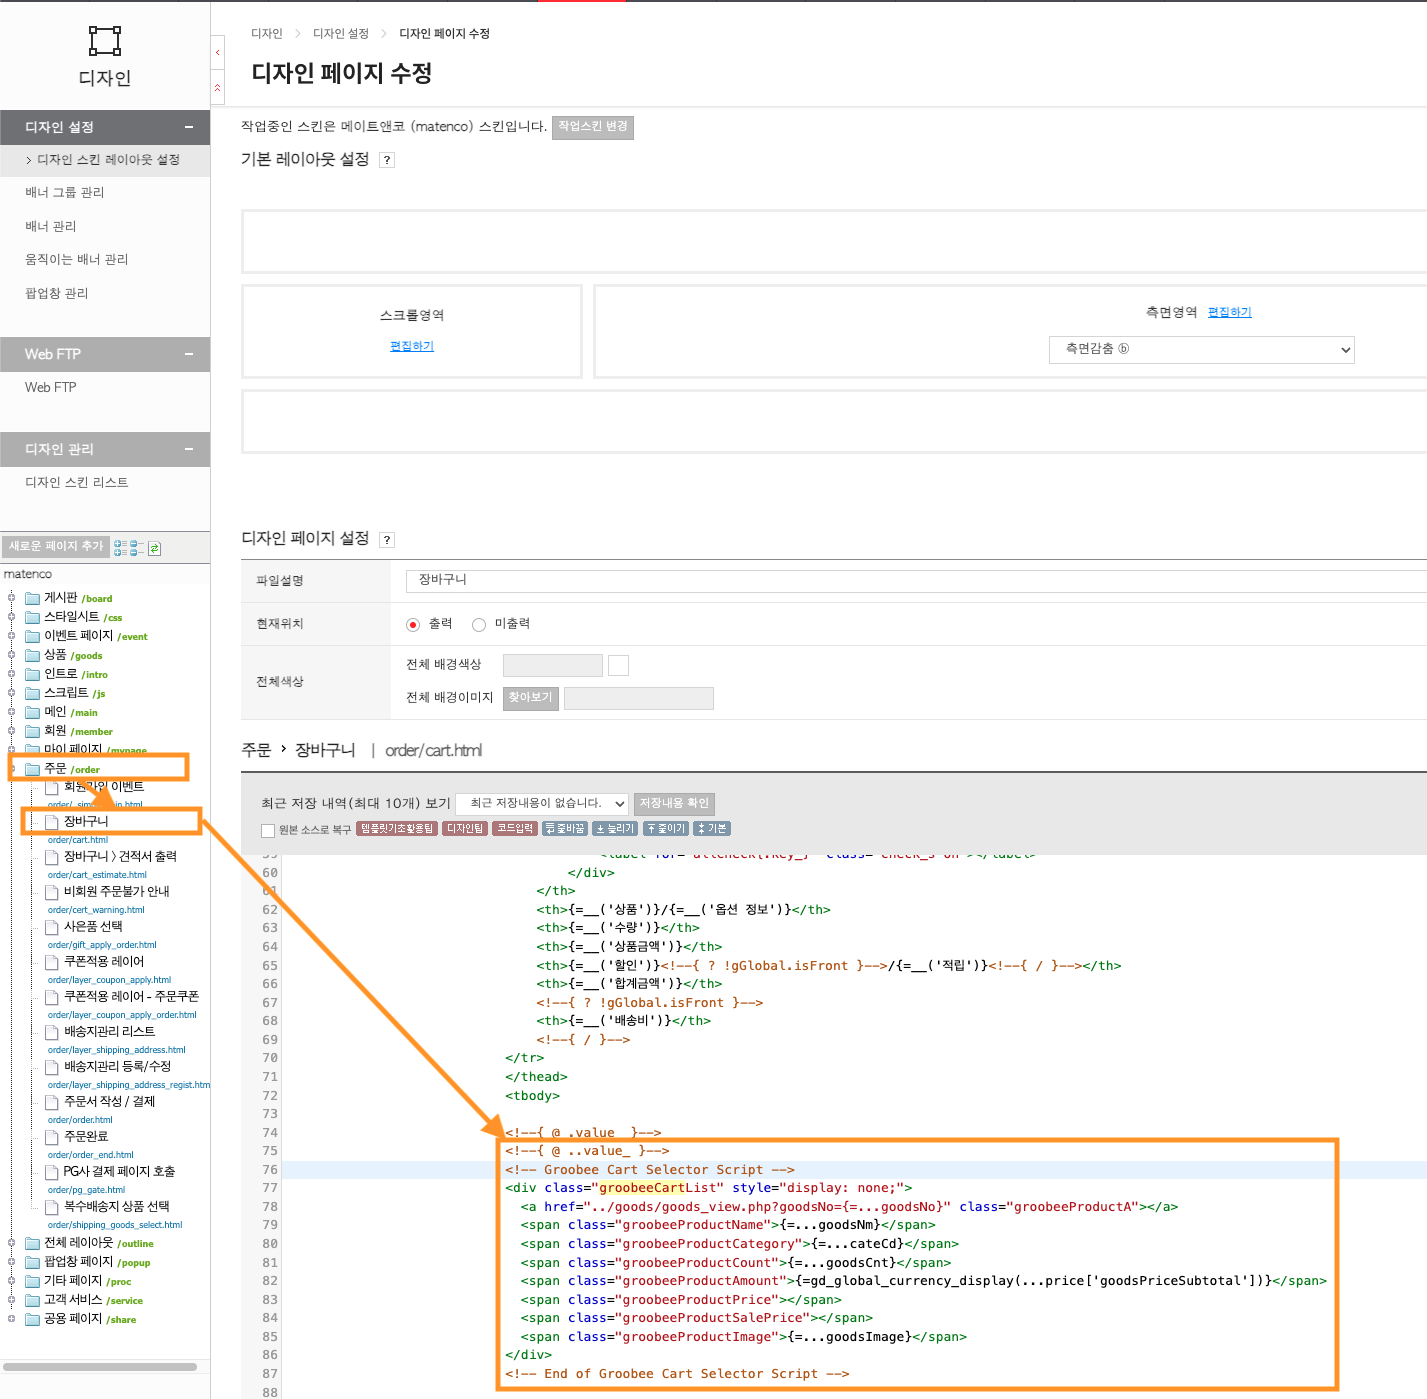
장바구니 페이지 (VC)
- 주문 > 장바구니 > <!--{ @ ..value_ }--> 하단에 아래 스크립트를 삽입합니다.
장바구니 이력 수집을 위한 스크립트 설치 위치 및 예시
<!-- Groobee Cart Selector Script -->
<div class="groobeeCartList" style="display: none;">
  <a href="../goods/goods_view.php?goodsNo={=...goodsNo}" class="groobeeProductA"></a>
  <span class="groobeeProductName">{=...goodsNm}</span>
  <span class="groobeeProductCategory">{=...cateCd}</span>
  <span class="groobeeProductCount">{=...goodsCnt}</span>
  <span class="groobeeProductAmount">{=gd_global_currency_display(...price['goodsPriceSubtotal'])}</span>
  <span class="groobeeProductPrice"></span>
  <span class="groobeeProductSalePrice"></span>
  <span class="groobeeProductImage">{=...goodsImage}</span>
</div>
<!-- End of Groobee Cart Selector Script -->
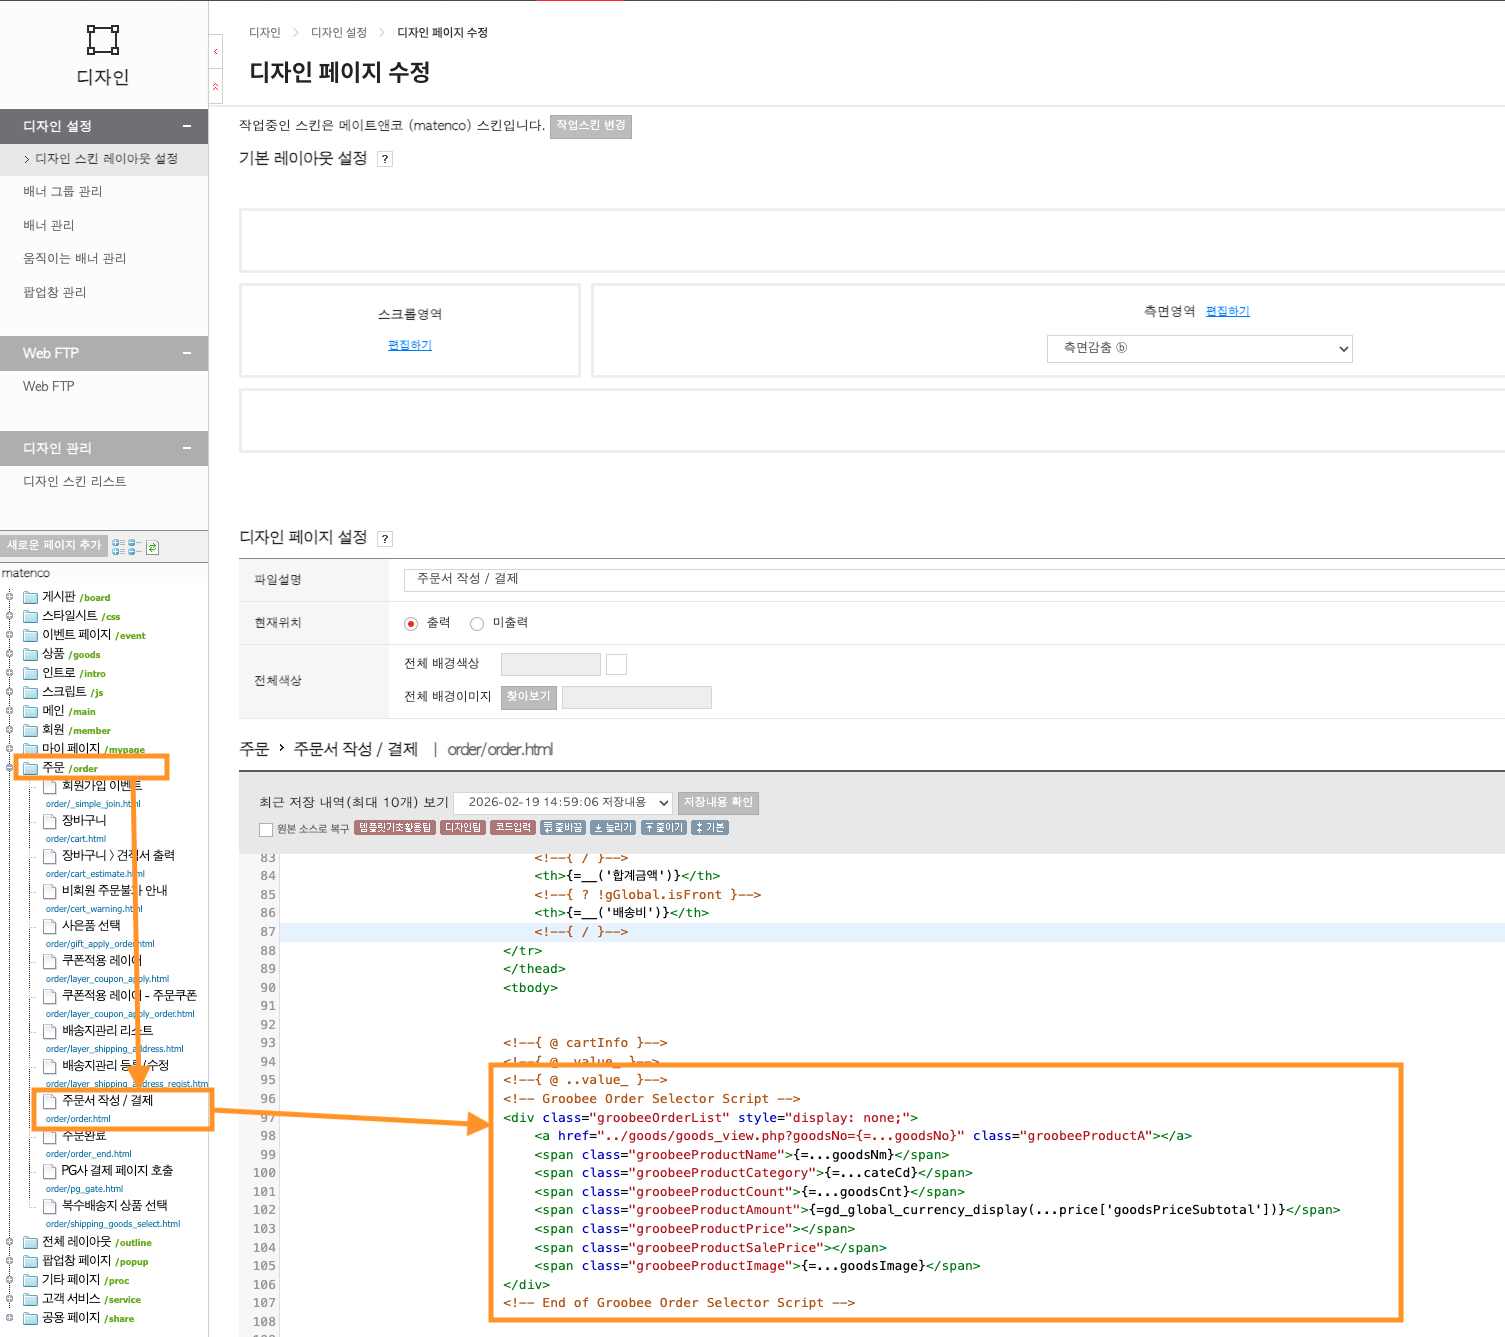
주문서 작성 페이지 (OR)
- 주문 > 주문서 작성 > <!--{ @ ..value_ }--> 하단에 아래 스크립트를 삽입합니다.
주문서 작성 이력 수집을 위한 스크립트 설치 위치 및 예시
<!-- Groobee Order Selector Script -->
<div class="groobeeOrderList" style="display: none;">
  <a href="../goods/goods_view.php?goodsNo={=...goodsNo}" class="groobeeProductA"></a>
  <span class="groobeeProductName">{=...goodsNm}</span>
  <span class="groobeeProductCategory">{=...cateCd}</span>
  <span class="groobeeProductCount">{=...goodsCnt}</span>
  <span class="groobeeProductAmount">{=gd_global_currency_display(...price['goodsPriceSubtotal'])}</span>
  <span class="groobeeProductPrice"></span>
  <span class="groobeeProductSalePrice"></span>
  <span class="groobeeProductImage">{=...goodsImage}</span>
</div>
<!-- End of Groobee Order Selector Script -->
주문완료 페이지 (PU)
- 주문 완료 이력은 웹 페이지 URL 등록이 되어 있다면 자동으로 수집됩니다.
별도의 코드 삽입이 필요하지 않습니다.
카테고리 페이지 (CA)
- 상품 > 상품 리스트 페이지 > { # header } 하단에 아래 스크립트를 삽입합니다.
카테고리 이력 수집을 위한 스크립트 설치 위치 및 예시
고도몰 (e나무)
페이지 내에 공통 스크립트가 고도몰(e나무) 유형 (godomall, godomall_m)으로 정상 설치 되어 있다면, 아래 스크립트들을 삽입하여 행동 이력을 수집할 수 있습니다.
고도몰(e나무) 웹 사이트 행동 이력 수집 방법 보기
메인 페이지 (MA)
- 메인 페이지 방문 이력은 웹 페이지 URL 등록이 되어 있다면 자동으로 수집됩니다.
별도의 코드 삽입이 필요하지 않습니다.
검색 결과 페이지 (SE)
- 검색 페이지 방문 이력은 웹 페이지 URL 등록이 되어 있다면 자동으로 수집됩니다.
별도의 코드 삽입이 필요하지 않습니다.
상품 상세 페이지 (VG)
- 상품 > 상품 상세 페이지에 아래 스크립트를 삽입합니다.
<!-- Groobee Selector Script -->
<div class="groobeeProductDetail" style="display: none;">
  <span class="groobeeProductName">{goodsnm}</span>
  <span class="groobeeProductPrice">{price}</span>
  <span class="groobeeProductSalePrice">{realprice}</span>
  <span class="groobeeProductCode">{goodsno}</span>
  <span class="groobeeProductImage">{=goodsimg(t_img[0],0,'id=objImg')}</span>
  <span class="groobeeProductCategory">{category}</span>
  <span class="groobeeProductCategoryName"></span>
  <span class="groobeeProductStatus"> {runout} </span>
</div> <!-- End of Groobee Selector Script -->
장바구니 페이지 (VC)
- 기타페이지 > 장바구니 상품목록 > <!--{ @ cart->item }--> 하단에 아래 스크립트를 삽입합니다.
<!-- Groobee Cart & Order Selector Script -->
<div class="groobeeProductList" style="display: none;">
  <a href="../goods/goods_view.php?goodsno={.goodsno}" class="groobeeProductA"></a>
  <span class="groobeeProductName">{.goodsnm}</span>
  <span class="groobeeProductCount">{.ea}</span>
  <span class="groobeeProductAmount">{=number_format((.price + .addprice)*.ea)}</span>
  <span class="groobeeProductPrice">{=number_format(.price + .addprice)}</span>
  <span class="groobeeProductSalePrice">{=number_format(.price - .special_discount_amount)}</span>
  <span class="groobeeProductImage">{=goodsimgTS(.img,100)}</span>
  <span class="groobeeProductCategory"></span>
</div>
<!-- End of Groobee Cart & Order Selector Script -->
주문서 작성 페이지 (OR)
- 기타/추가페이지 > 주문상품 > <!--{ @ cart->item }--> 하단에 삽입 아래 스크립트를 삽입합니다.
<!-- Groobee Cart & Order Selector Script -->
<div class="groobeeProductList" style="display: none;">
    <a href="../goods/goods_view.php?goodsno={.goodsno}" class="groobeeProductA"></a>
    <span class="groobeeProductName">{.goodsnm}</span>
    <span class="groobeeProductCount">{.ea}</span>
    <span class="groobeeProductAmount">{=number_format((.price + .addprice)*.ea)}</span>
    <span class="groobeeProductPrice">{=number_format(.price + .addprice)}</span>
    <span class="groobeeProductSalePrice">{=number_format(.price - .special_discount_amount)}</span>
    <span class="groobeeProductImage">{=goodsimgTS(.img,100)}</span>
    <span class="groobeeProductCategory"></span>
</div>
<!-- End of Groobee Cart & Order Selector Script -->
주문완료 페이지 (PU)
- 주문 완료 이력은 웹 페이지 URL 등록이 되어 있다면 자동으로 수집됩니다.
별도의 코드 삽입이 필요하지 않습니다.
카테고리 페이지 (CA)
- PC의 경우 상품 > 분류화면 페이지, 모바일의 경우 상품 > 분류/검색 상품리스트 페이지에 아래 스크립트를 삽입합니다.
메이크샵
페이지 내에 공통 스크립트가 메이크샵 유형 (makeshop, makeshop_m)으로 정상 설치 되어 있다면, 아래 스크립트들을 삽입하여 행동 이력을 수집할 수 있습니다.
- 각 스크립트의 사이트주소 부분에는 https://myshop.make.shop 처럼 사이트 주소를 입력하면 됩니다.
- 메이크샵의 경우 스킨에 따라 스크립트 삽입 위치가 다를 수 있습니다. 아래 가이드는 참고용으로 제공되는 예시이므로, 실제 사용하시는 스킨에서 유사한 위치를 찾아 삽입해주시면 됩니다.
메이크샵 웹 사이트 행동 이력 수집 방법 보기
메인 페이지 (MA)
- 메인 페이지 방문 이력은 웹 페이지 URL 등록이 되어 있다면 자동으로 수집됩니다.
별도의 코드 삽입이 필요하지 않습니다.
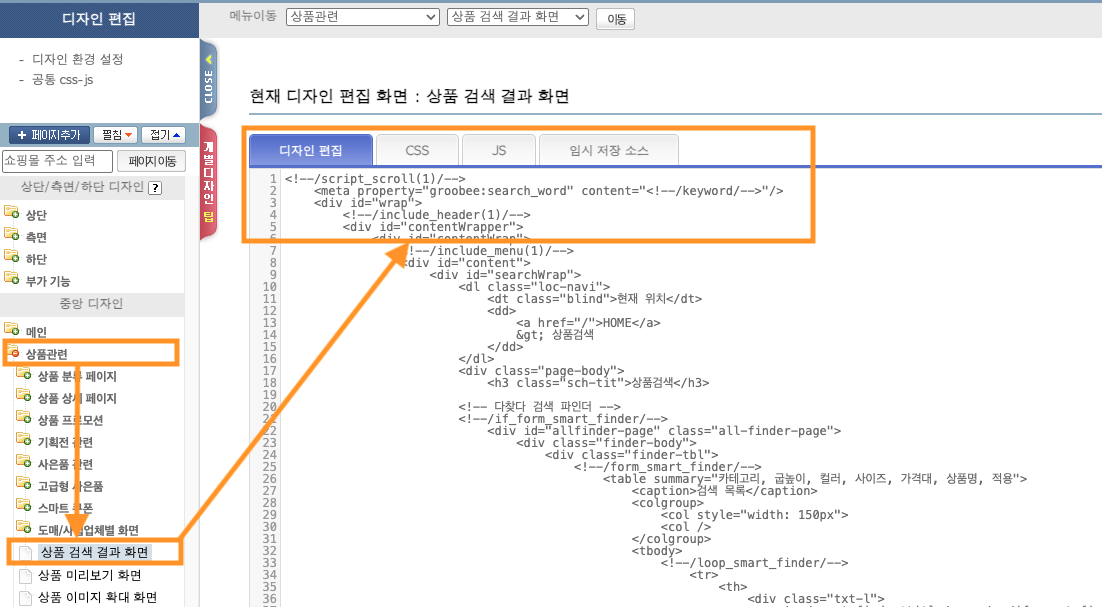
검색 결과 페이지 (SE)
- 중앙디자인 > 상품관련 > 상품 검색 결과 화면에 아래 스크립트를 삽입합니다.
검색 결과 이력 수집을 위한 스크립트 설치 위치 및 예시
상품 상세 페이지 (VG)
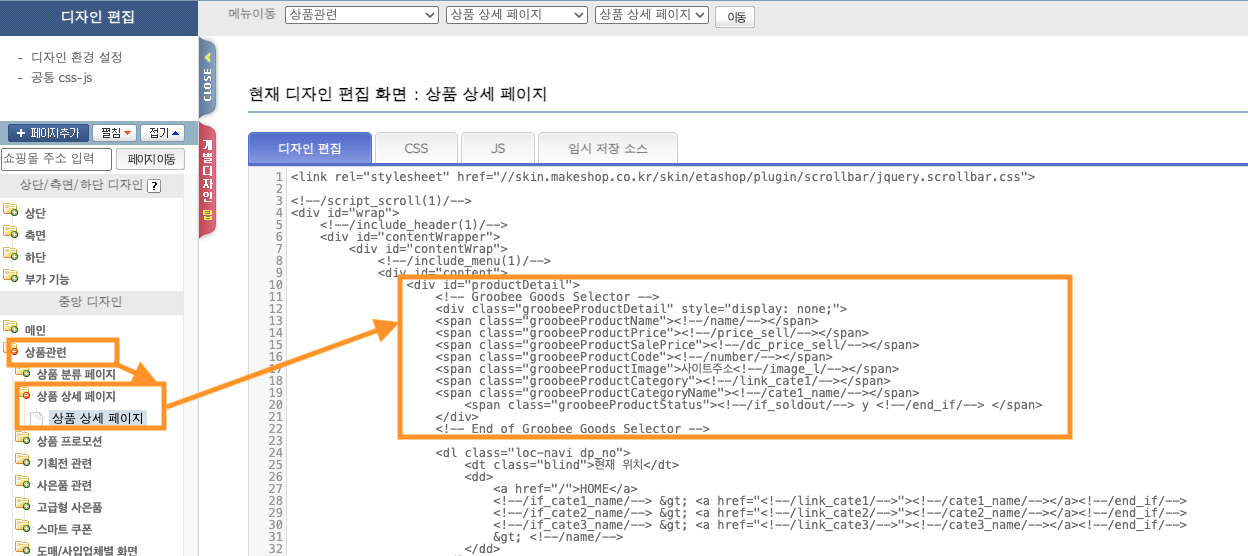
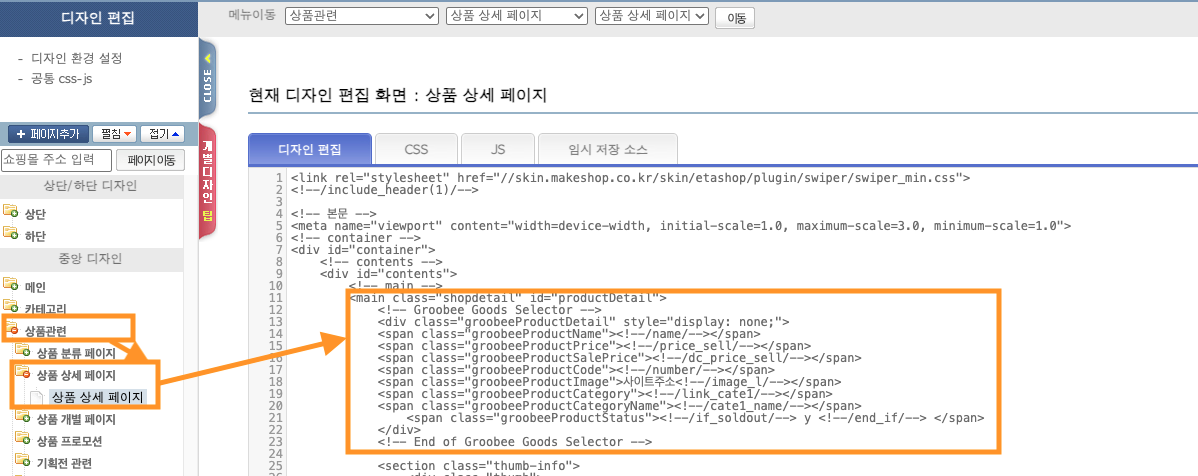
- 상품관련 > 상품상세페이지 > (PC) <div id="productDetail"> / (모바일) <main class=”shopdetail” id="productDetail"> 하단에 아래 스크립트를 삽입합니다.
상품 상세 이력 수집을 위한 스크립트 설치 위치 및 예시 (PC)
상품 상세 이력 수집을 위한 스크립트 설치 위치 및 예시 (모바일)
<!-- Groobee Goods Selector -->
<div class="groobeeProductDetail" style="display: none;">
<span class="groobeeProductName"><!--/name/--></span>
<span class="groobeeProductPrice"><!--/price_sell/--></span>
<span class="groobeeProductSalePrice"><!--/dc_price_sell/--></span>
<span class="groobeeProductCode"><!--/number/--></span>
<span class="groobeeProductImage">사이트주소<!--/image_l/--></span>
<span class="groobeeProductCategory"><!--/link_cate1/--></span>
<span class="groobeeProductCategoryName"><!--/cate1_name/--></span>
    <span class="groobeeProductStatus"><!--/if_soldout/--> y <!--/end_if/--> </span>
</div>
<!-- End of Groobee Goods Selector -->
장바구니 페이지 (VC)
-
사용하시는 장바구니 / 통합장바구니2 화면에 스크립트를 삽입해줘야합니다.
아래 스크립트 삽입 방법들을 참고해주세요. -
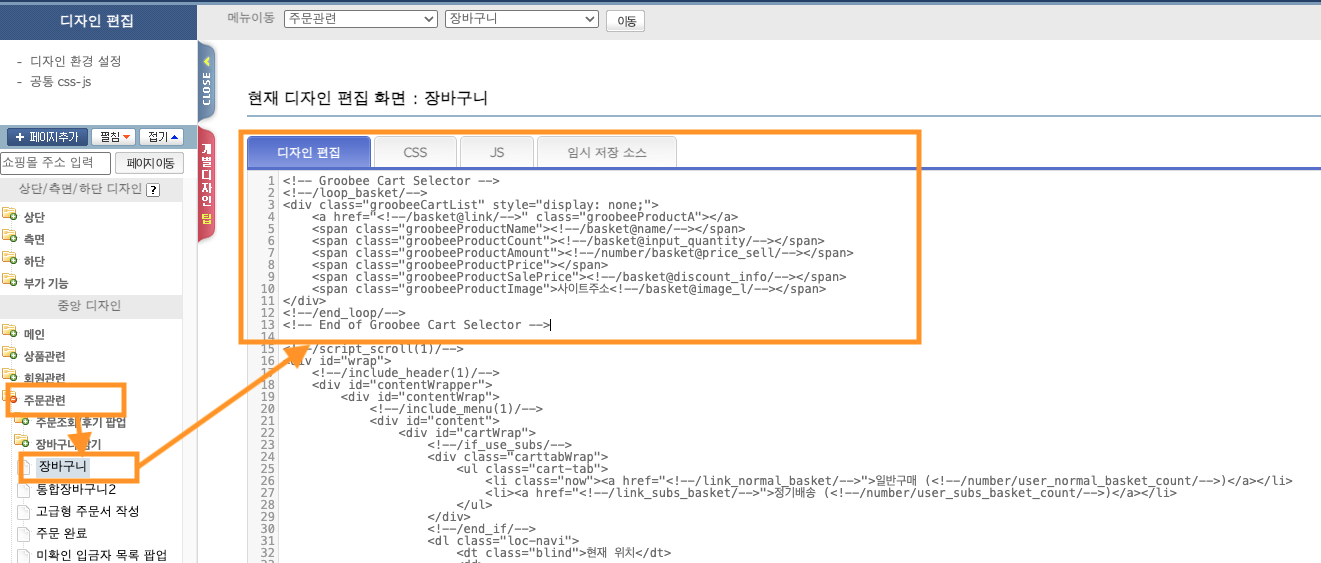
주문관련 > 장바구니 화면에 아래 스크립트들을 삽입합니다.
장바구니 이력 수집을 위한 스크립트 설치 위치 및 예시
<!-- Groobee Cart Selector -->
<!--/loop_basket/-->
<div class="groobeeCartList" style="display: none;">
    <a href="<!--/basket@link/-->" class="groobeeProductA"></a>
    <span class="groobeeProductName"><!--/basket@name/--></span>
    <span class="groobeeProductCount"><!--/basket@input_quantity/--></span>
    <span class="groobeeProductAmount"><!--/number/basket@price_sell/--></span>
    <span class="groobeeProductPrice"></span>
    <span class="groobeeProductSalePrice"><!--/basket@discount_info/--></span>
    <span class="groobeeProductImage">사이트주소<!--/basket@image_l/--></span>
</div>
<!--/end_loop/-->
<!-- End of Groobee Cart Selector -->
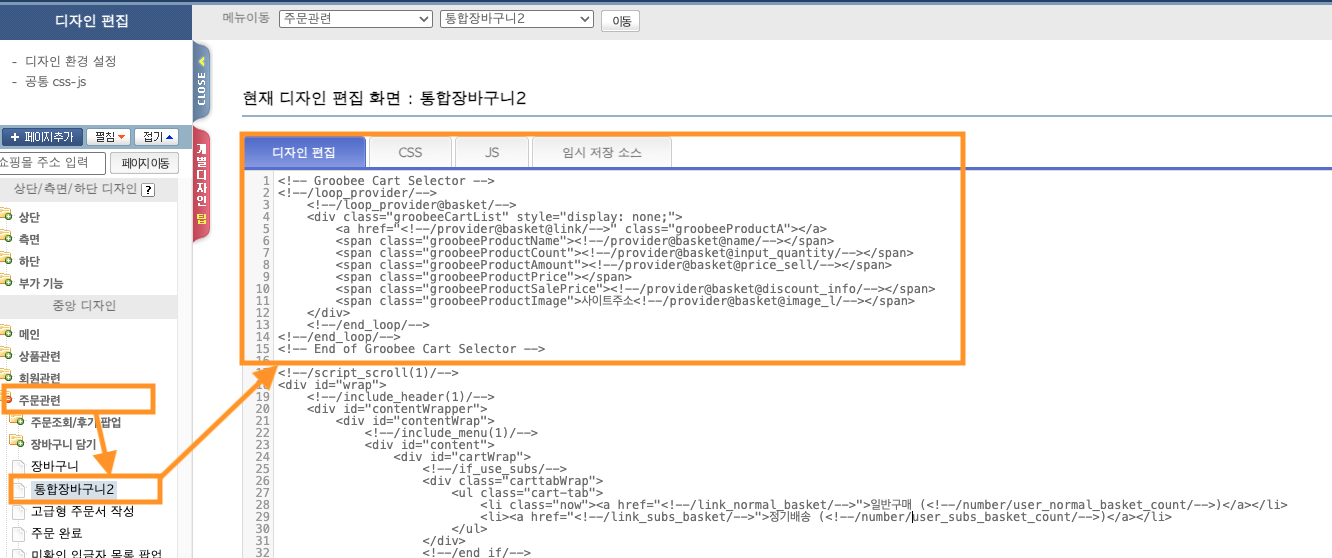
- 주문관련 > 통합장바구니2 화면에 아래 스크립트들을 삽입합니다.
통합장바구니 이력 수집을 위한 스크립트 설치 위치 및 예시
<!-- Groobee Cart Selector -->
<!--/loop_provider/-->
    <!--/loop_provider@basket/-->
    <div class="groobeeCartList" style="display: none;">
        <a href="<!--/provider@basket@link/-->" class="groobeeProductA"></a>
        <span class="groobeeProductName"><!--/provider@basket@name/--></span>
        <span class="groobeeProductCount"><!--/provider@basket@input_quantity/--></span>
        <span class="groobeeProductAmount"><!--/provider@basket@price_sell/--></span>
        <span class="groobeeProductPrice"></span>
        <span class="groobeeProductSalePrice"><!--/provider@basket@discount_info/--></span>
        <span class="groobeeProductImage">사이트주소<!--/provider@basket@image_l/--></span>
    </div>
    <!--/end_loop/-->
<!--/end_loop/-->
<!-- End of Groobee Cart Selector -->
- <!--/basket@input_quantity/--> 는 Ctrl+F로 검색하여 기존에 있는 치환태그와 동일하게 입력해야합니다. 예) 기존에 사용 중인 치환태그가 <!--/basket@input_quantity(txt-span)/--> 라면 Selector 스크립트도 이와 일치시켜야 합니다.
일치시키지 않는다면 수량 변경 부분의 UI가 깨질 수 있습니다.- 장바구니 설치 후 상품 수 인풋 박스 수량 테스트
만약 상품 수 인풋 박스가 정상적으로 바뀌지 않는다면 추가된 Groobee 스크립트로 인해 문제가 발생한 것입니다.
<input name=”amount”> 가 겹치면서 생기는 오류일 가능성이 높으므로. Groobee 장바구니 스크립트를 하단으로 이동시키면 됩니다.
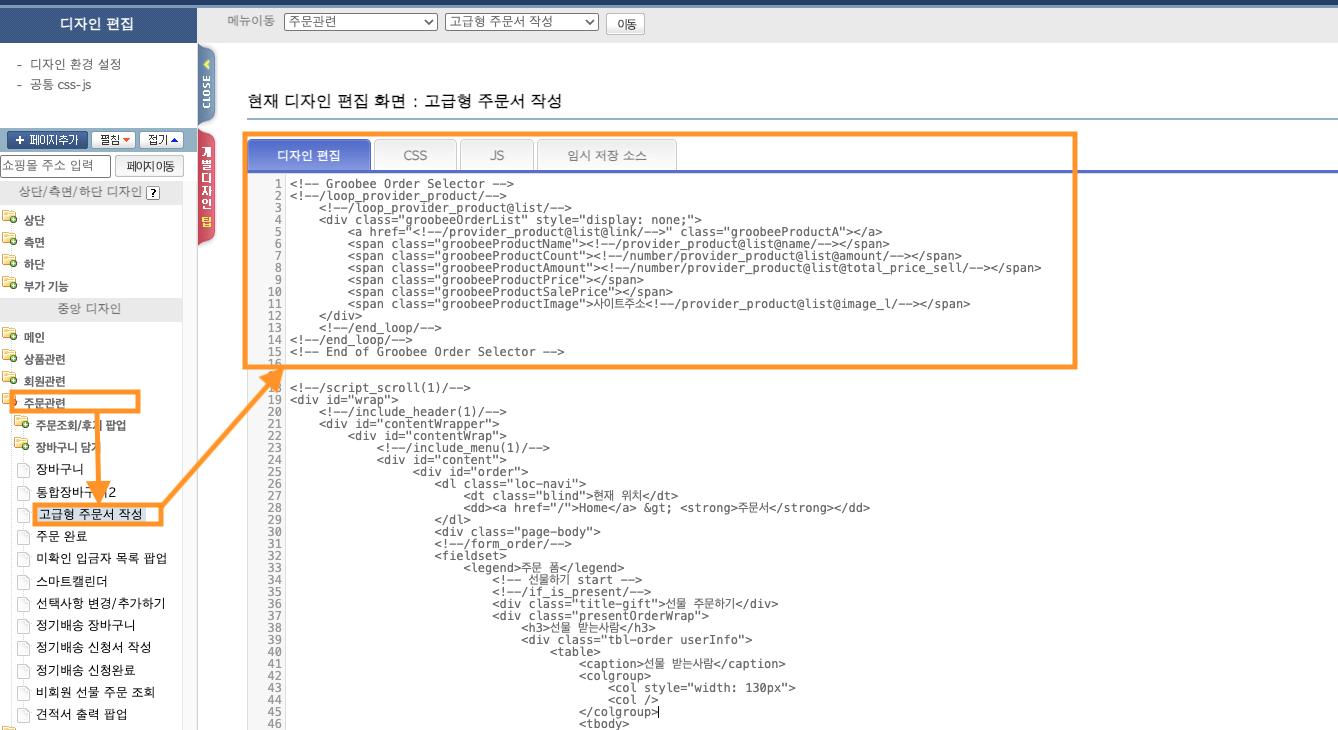
주문서 작성 페이지 (OR)
- 주문관련 > (고급형) 주문서 작성 (현재 사용하는 주문서 페이지)에 삽입합니다.
주문서 작성 이력 수집을 위한 스크립트 설치 위치 및 예시
<!-- Groobee Order Selector -->
<!--/loop_provider_product/-->
    <!--/loop_provider_product@list/-->
    <div class="groobeeOrderList" style="display: none;">
        <a href="<!--/provider_product@list@link/-->" class="groobeeProductA"></a>
        <span class="groobeeProductName"><!--/provider_product@list@name/--></span>
        <span class="groobeeProductCount"><!--/number/provider_product@list@amount/--></span>
        <span class="groobeeProductAmount"><!--/number/provider_product@list@total_price_sell/--></span>
        <span class="groobeeProductPrice"></span>
        <span class="groobeeProductSalePrice"></span>
        <span class="groobeeProductImage">사이트주소<!--/provider_product@list@image_l/--></span>
    </div>
    <!--/end_loop/-->
<!--/end_loop/-->
<!-- End of Groobee Order Selector -->
주문완료 페이지 (PU)
- 주문 완료 이력은 웹 페이지 URL 등록이 되어 있다면 자동으로 수집됩니다.
별도의 코드 삽입이 필요하지 않습니다.
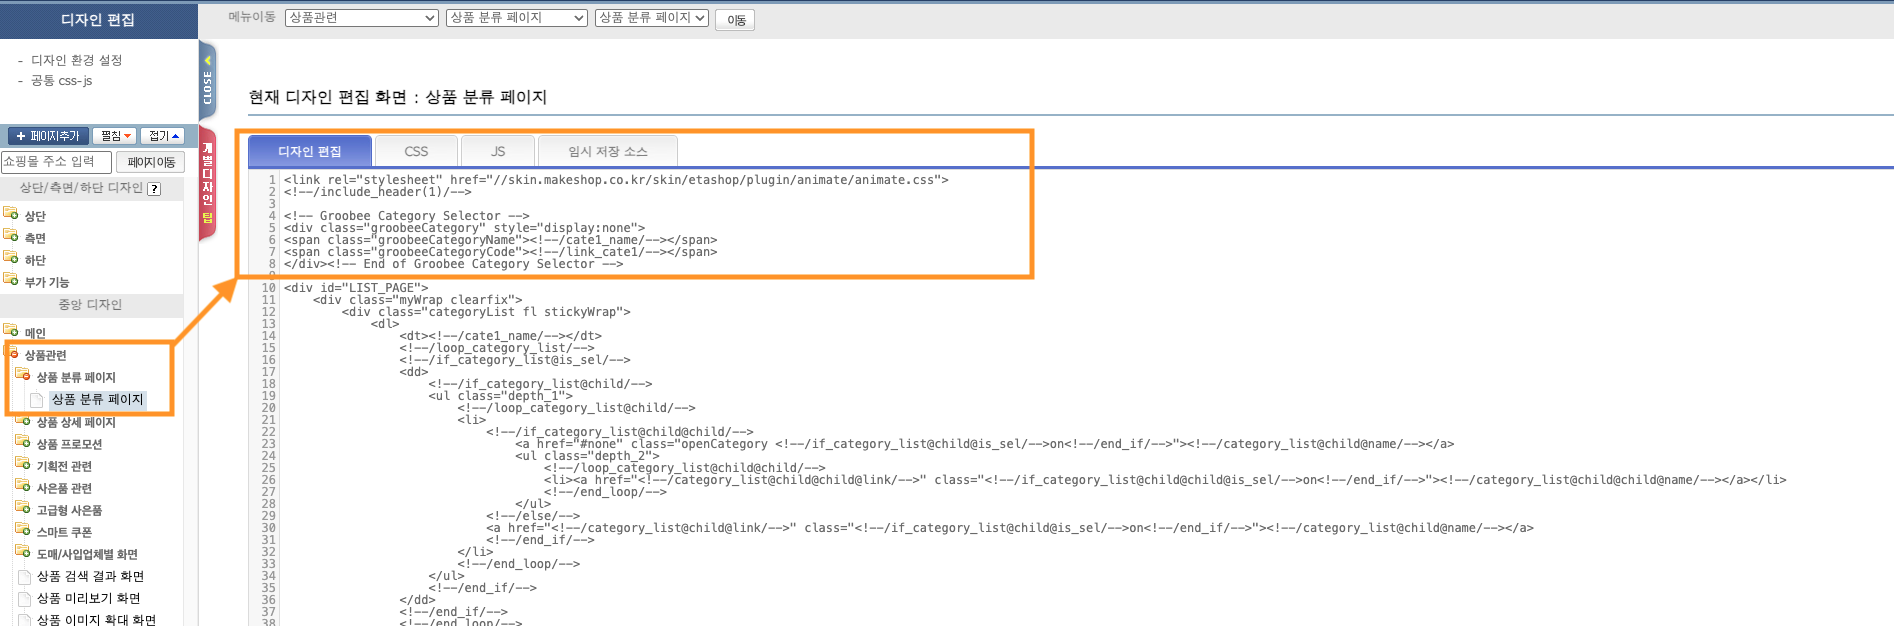
카테고리 페이지 (CA)
- 상품 > 상품 분류 페이지 > 상품 분류 페이지에 아래 스크립트를 삽입합니다.
카테고리 이력 수집을 위한 스크립트 설치 위치 및 예시
위사 (스마트윙)
페이지 내에 공통 스크립트가 위사(스마트윙) 유형 (wisa, wisa)으로 정상 설치 되어 있다면, 아래 스크립트들을 삽입하여 행동 이력을 수집할 수 있습니다.
위사 (스마트윙) 웹 사이트 행동 이력 수집 방법 보기
메인 페이지 (MA)
- 메인 페이지 방문 이력은 웹 페이지 URL 등록이 되어 있다면 자동으로 수집됩니다.
별도의 코드 삽입이 필요하지 않습니다.
검색 결과 페이지 (SE)
- 검색 페이지 방문 이력은 웹 페이지 URL 등록이 되어 있다면 자동으로 수집됩니다.
별도의 코드 삽입이 필요하지 않습니다.
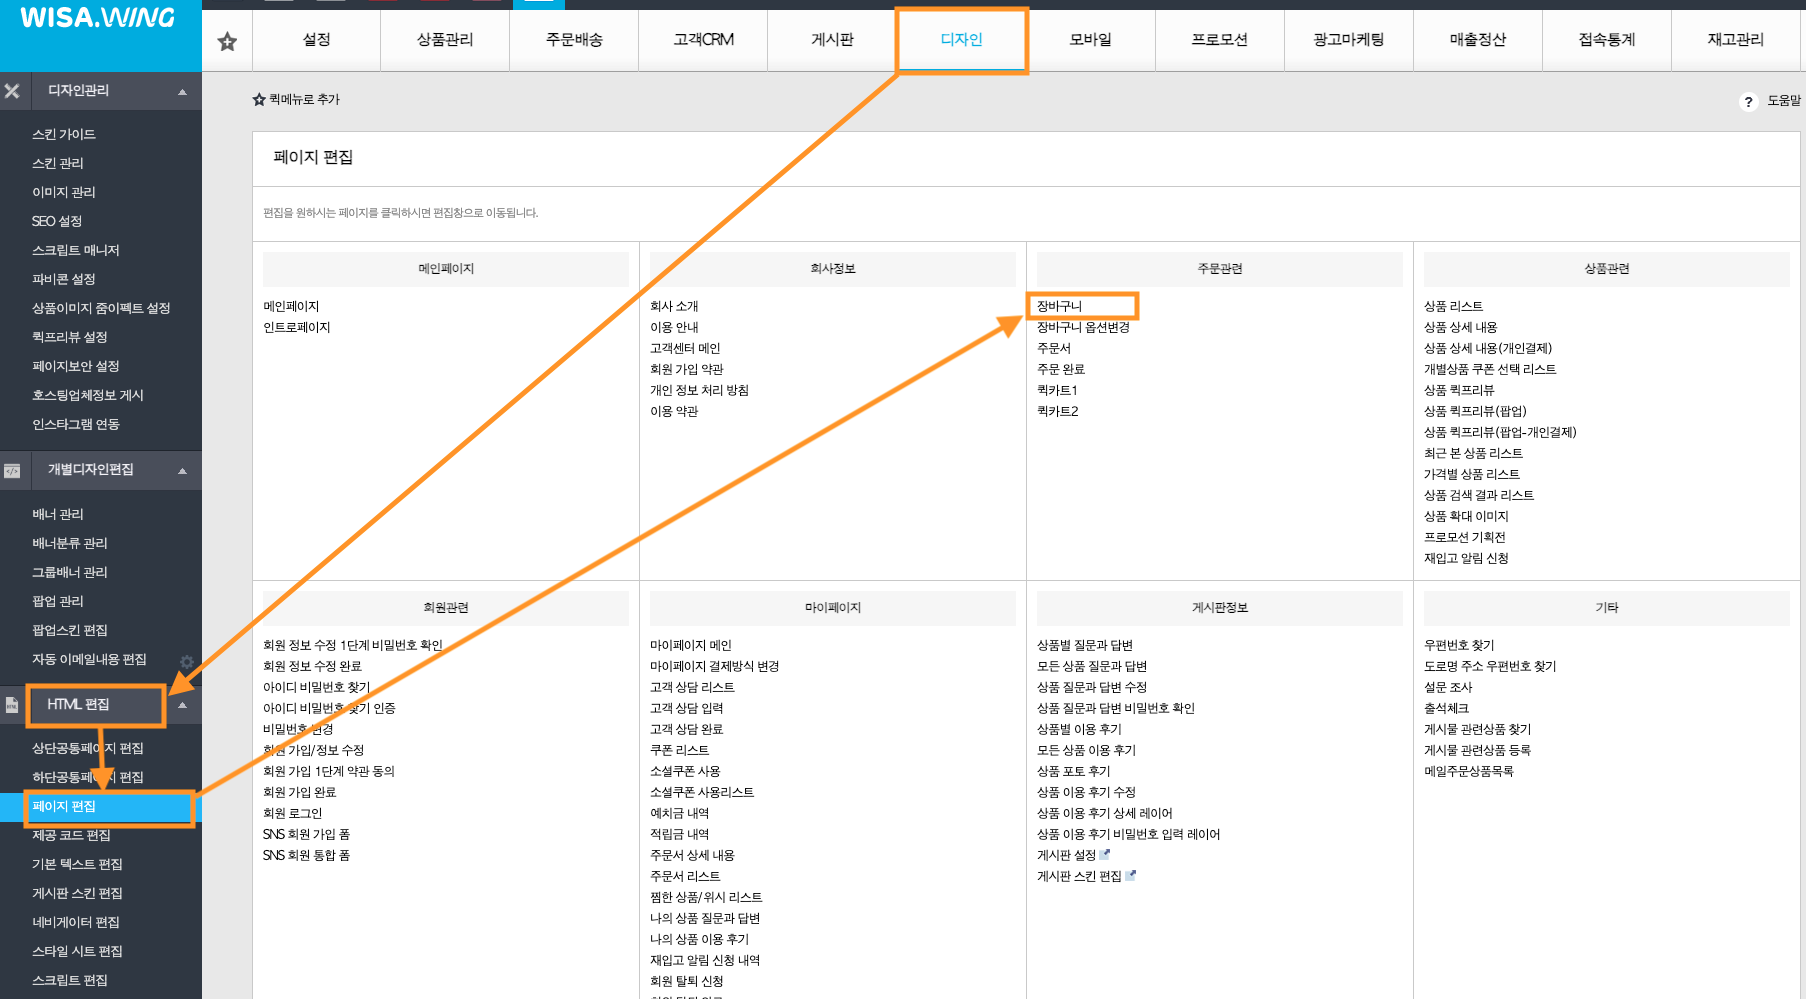
장바구니 페이지 (VC)
- HTML 편집 > 페이지 편집 > 주문관련 > 장바구니로 이동합니다.
- 장바구니 에디터 하단의 페이지 코드 > 반복문 > {{$장바구니리스트}} 편집하기 > 리스트 반복 구문을 삽입합니다.
장바구니 편집 화면 위치
장바구니 > 반복문 > 장바구니리스트 편집기 위치
코드 삽입 예시
<!-- Groobee Cart Selector Script -->
<div class="groobeeCartList" style="display: none;">
    <span class="groobeeProductA">{{$상품명(링크포함)}}</span>
    <span class="groobeeProductName">{{$상품명}}</span>
    <span class="groobeeProductCount">{{$구매수량}}</span>
    <span class="groobeeProductAmount">{{$상품판매가격}}</span>
    <span class="groobeeProductPrice">{{$상품가격}}</span>
    <span class="groobeeProductSalePrice">{{$상품가격}}</span>
    <span class="groobeeProductImage">{{$상품이미지경로}}</span>
</div>
<!-- End of Groobee Cart Selector Script -->
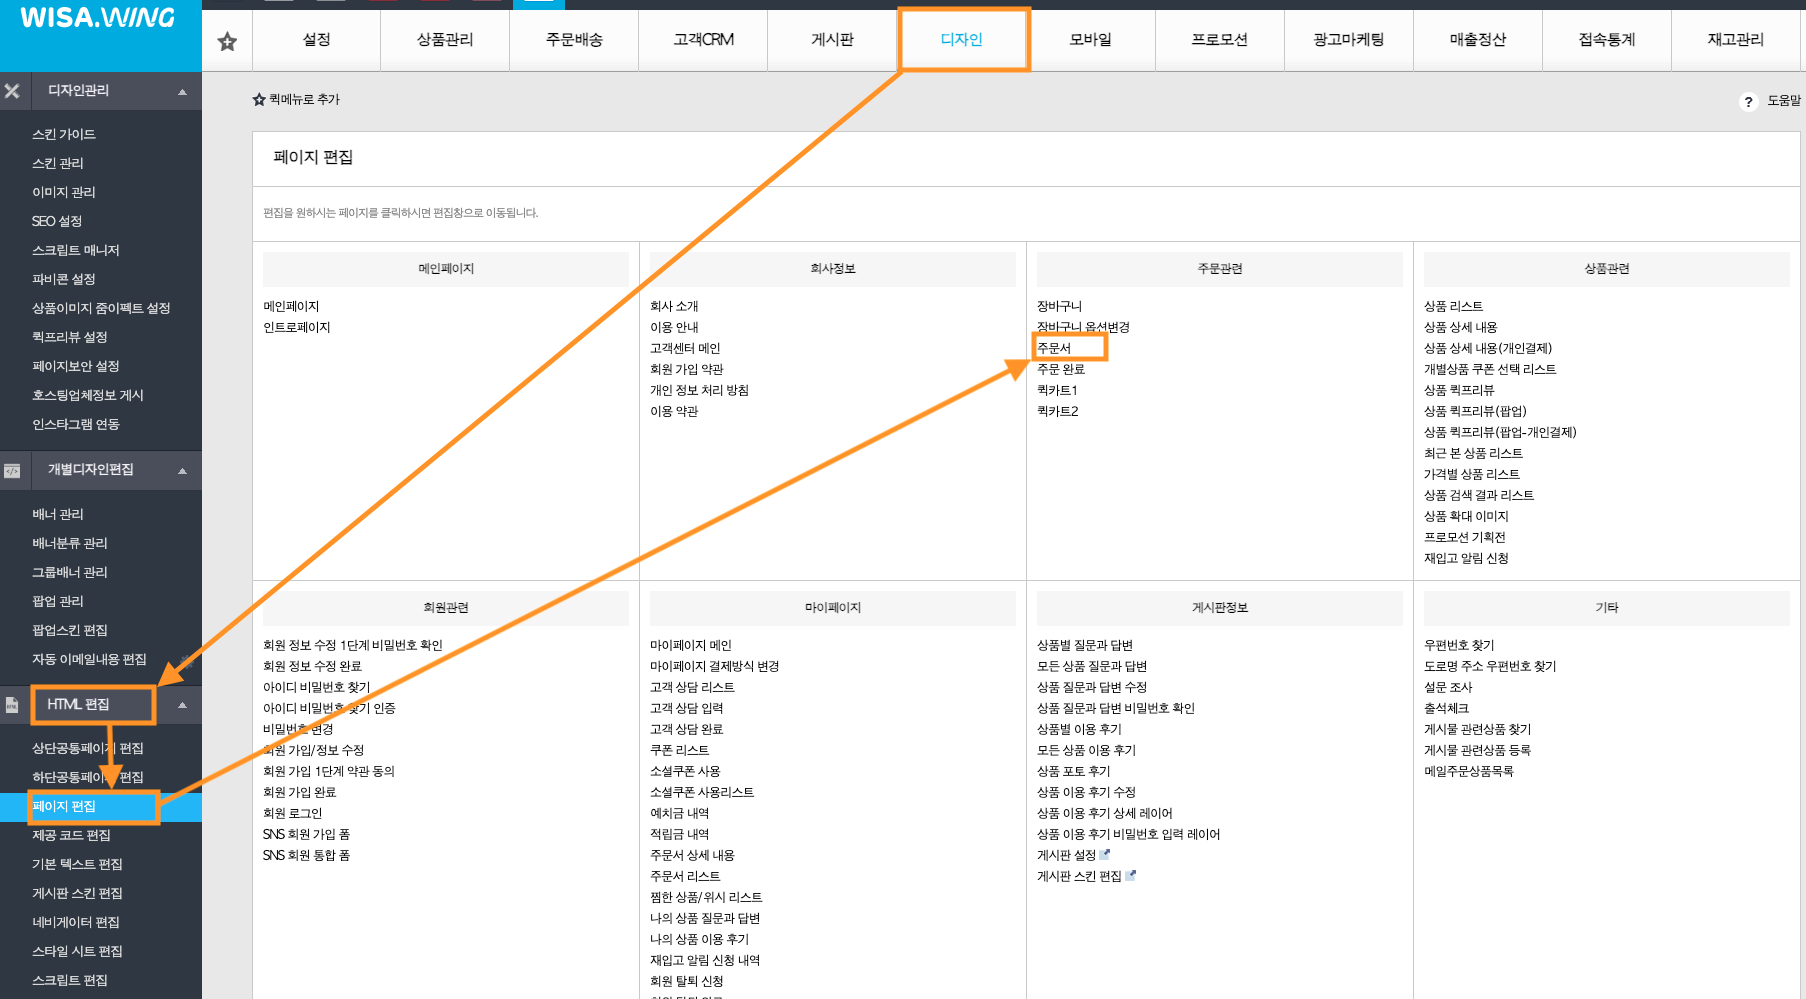
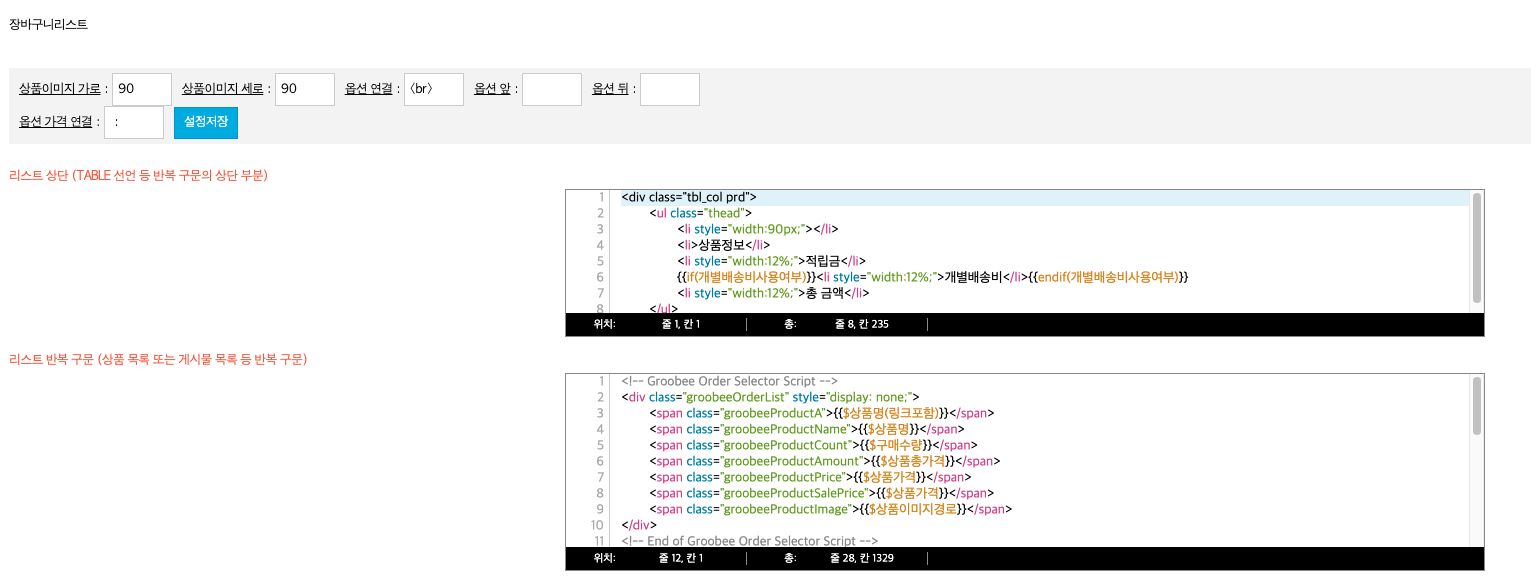
주문서 작성 페이지 (OR)
- HTML 편집 > 페이지 편집 > 주문관련 > 주문서로 이동합니다.
- 주문서 에디터 하단의 페이지 코드 > 반복문 > {{$장바구니리스트}} 편집하기 > 리스트 반복 구문을 삽입합니다.
주문서 작성 편집 화면 위치
주문서 > 반복문 > 장바구니리스트 편집기 위치
코드 삽입 예시
<!-- Groobee Order Selector Script -->
<div class="groobeeOrderList" style="display: none;">
    <span class="groobeeProductA">{{$상품명(링크포함)}}</span>
    <span class="groobeeProductName">{{$상품명}}</span>
    <span class="groobeeProductCount">{{$구매수량}}</span>
    <span class="groobeeProductAmount">{{$상품총가격}}</span>
    <span class="groobeeProductPrice">{{$상품가격}}</span>
    <span class="groobeeProductSalePrice">{{$상품가격}}</span>
    <span class="groobeeProductImage">{{$상품이미지경로}}</span>
</div>
<!-- End of Groobee Order Selector Script -->
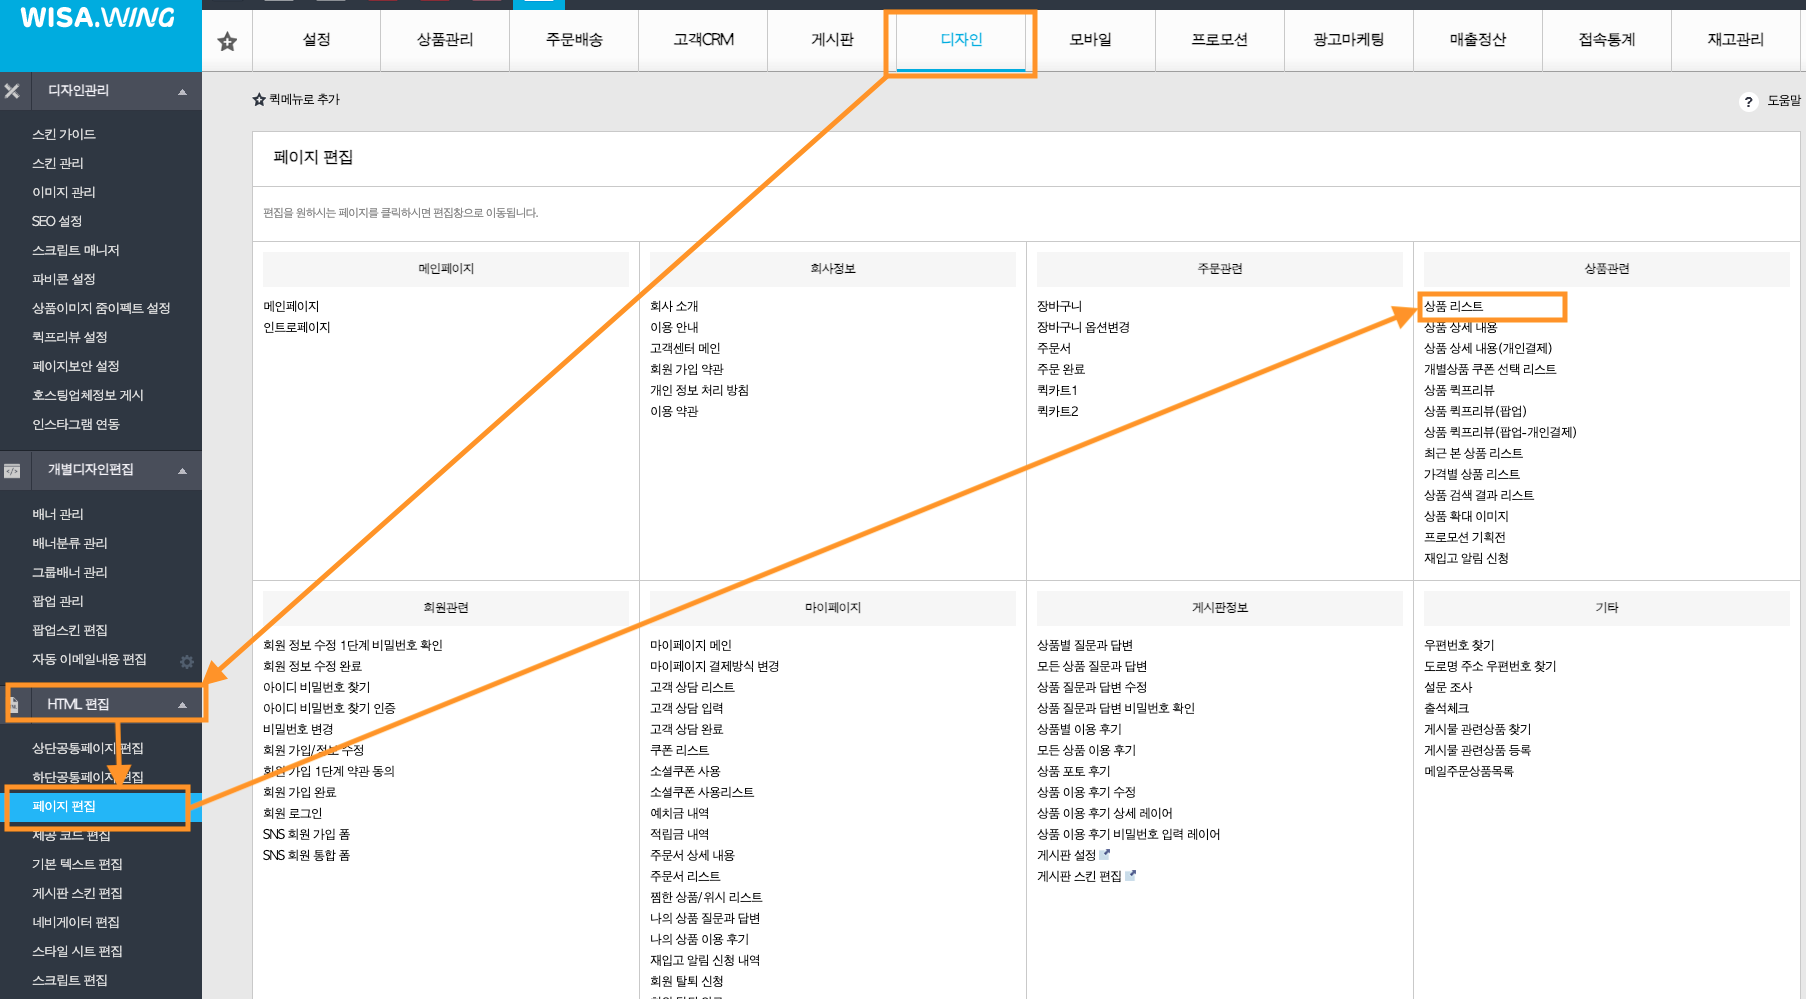
카테고리 페이지 (CA)
- 카테고리 스크립트는 상품 리스트 페이지에 추가하면 됩니다.
- HTML 편집 > 페이지 편집 > 상품관련 > 상품리스트로 이동해 아래 스크립트를 삽입합니다.
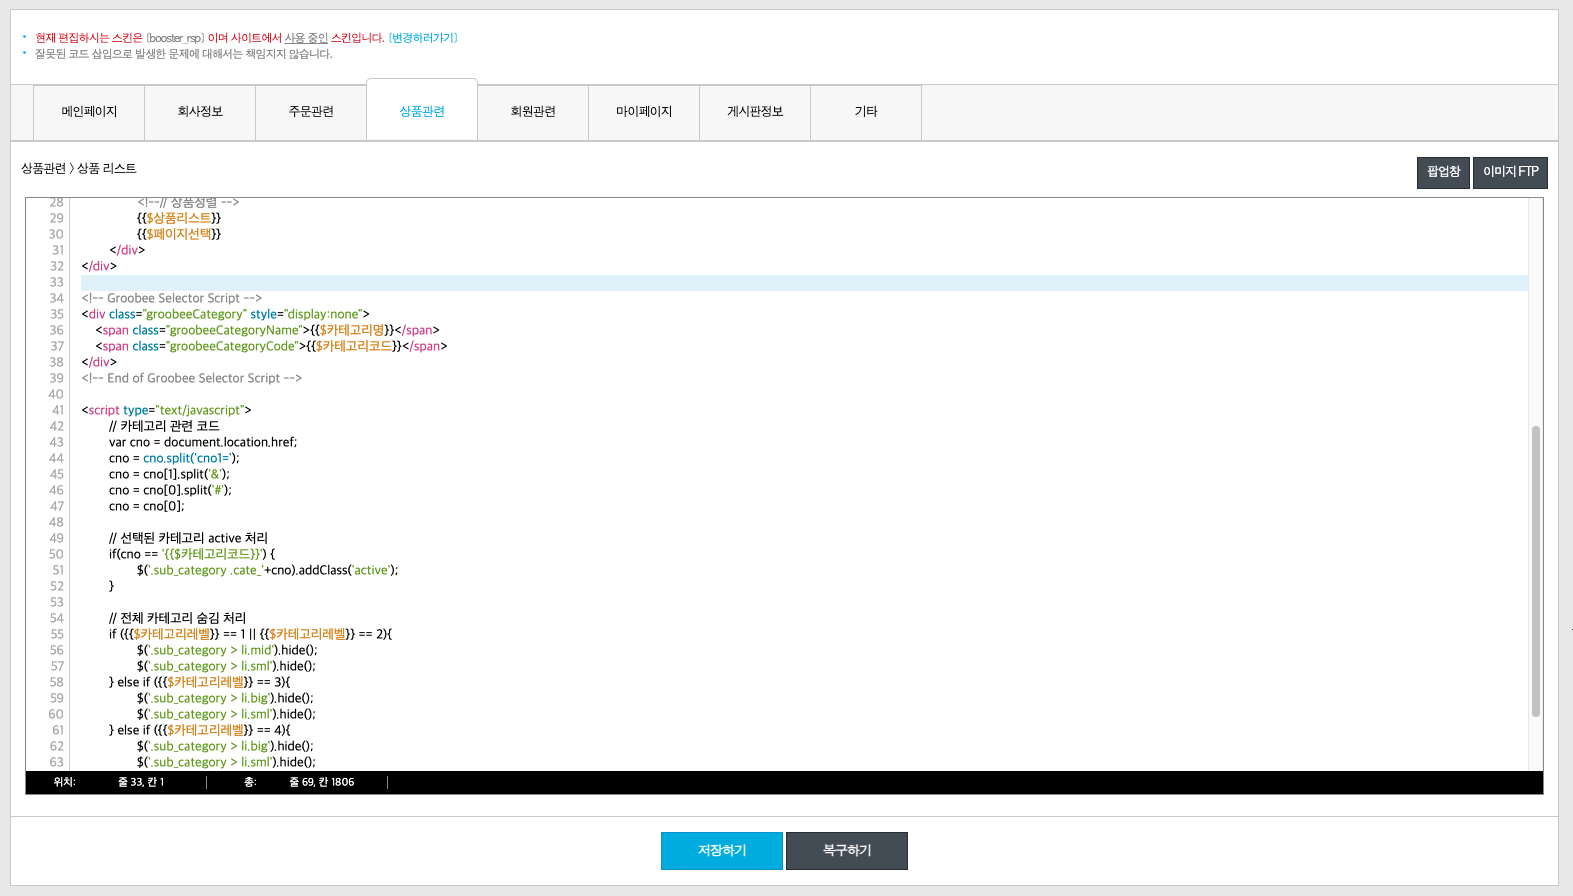
<!-- Groobee Selector Script -->
<div class="groobeeCategory" style="display:none">
    <span class="groobeeCategoryName">{{$카테고리명}}</span>
    <span class="groobeeCategoryCode">{{$카테고리코드}}</span>
</div>
<!-- End of Groobee Selector Script -->
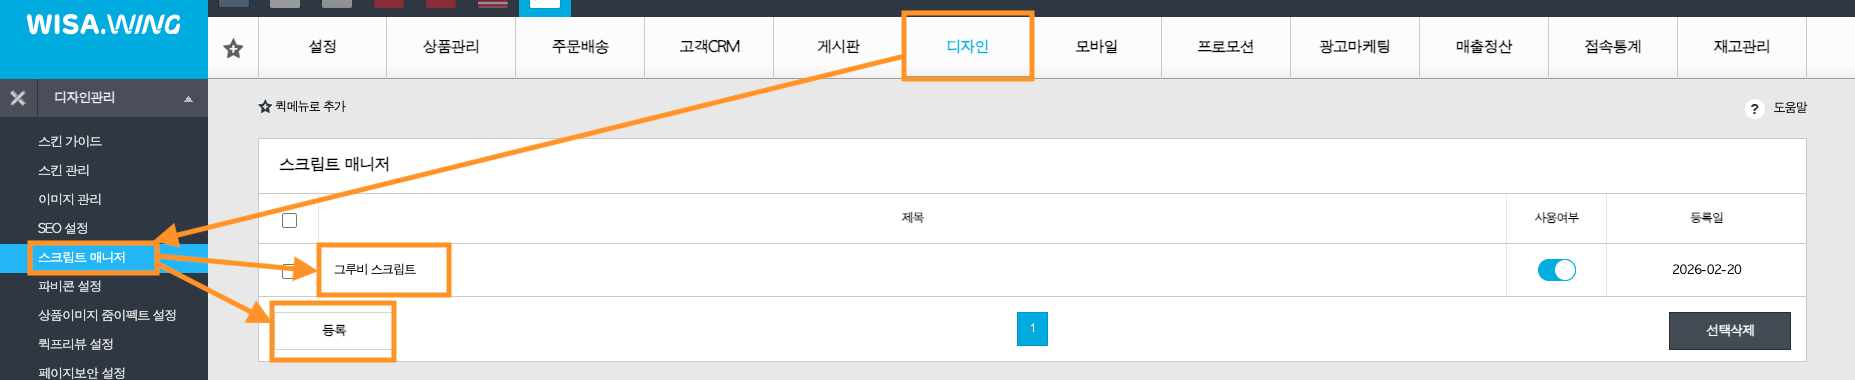
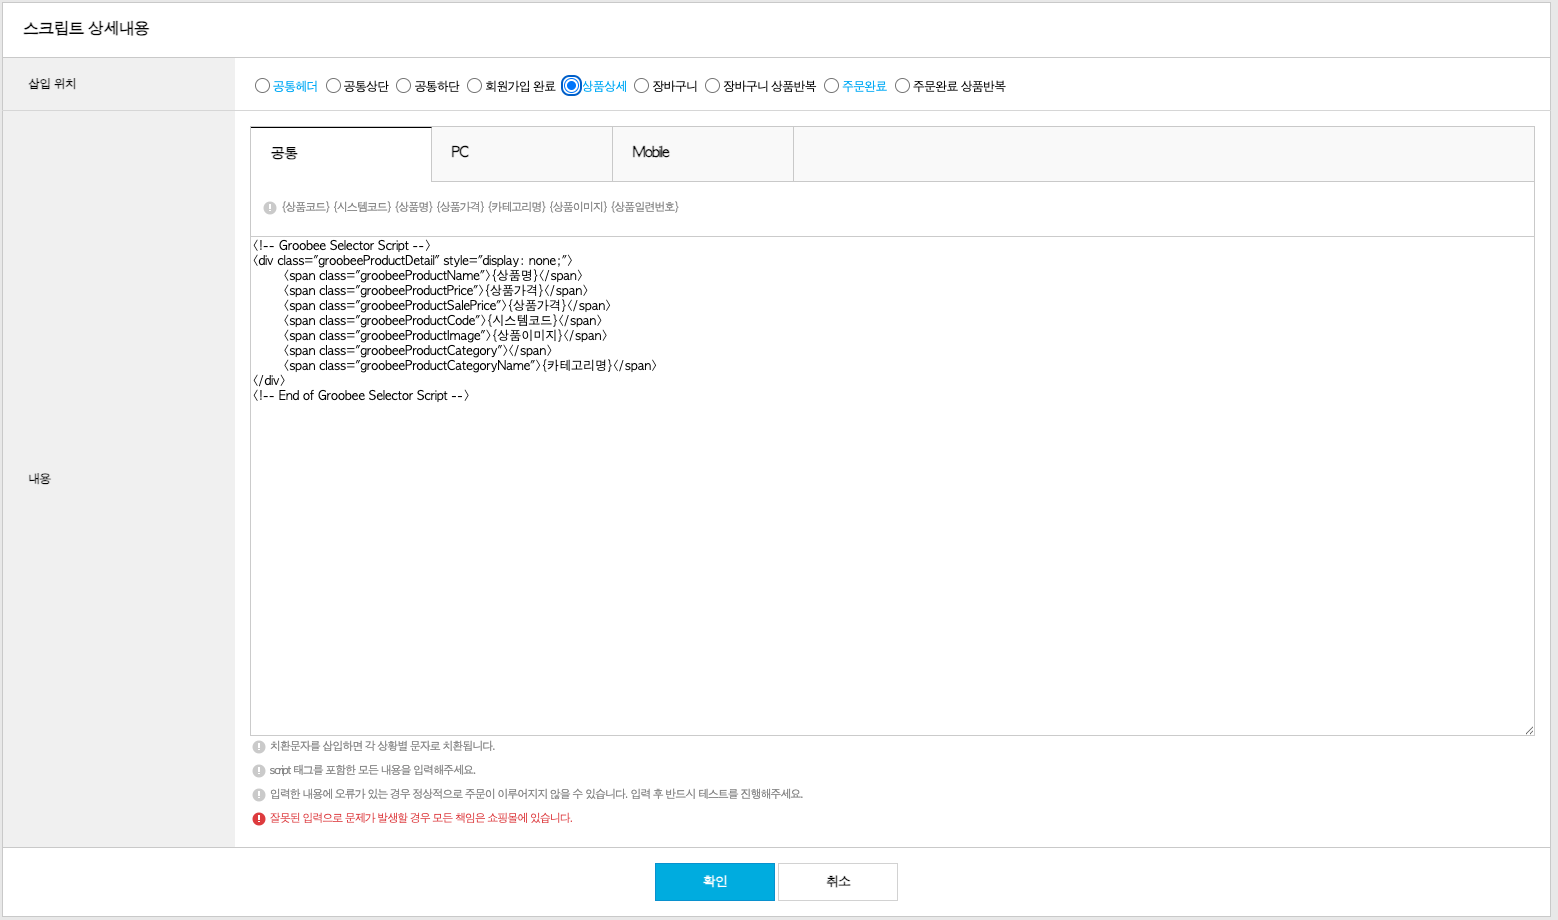
상품 상세 페이지 (VG)
- 위사 쇼핑몰 관리자 페이지에 로그인 한 후, 디자인 > 디자인관리 > 스크립트 매니저에 접속하여 상품상세 스크립트를 작성합니다.
공통 스크립트 설치 가이드를 참고하여 스크립트 매니저에 스크립트를 추가한 경우,
해당 스크립트 내에 아래 예시의 상품 상세 스크립트 부분을 추가로 작성해주시면 됩니다.
<!-- Groobee Selector Script -->
<div class="groobeeProductDetail" style="display: none;">
    <span class="groobeeProductName">{상품명}</span>
    <span class="groobeeProductPrice">{상품가격}</span>
    <span class="groobeeProductSalePrice">{상품가격}</span>
    <span class="groobeeProductCode">{시스템코드}</span>
    <span class="groobeeProductImage">{상품이미지}</span>
    <span class="groobeeProductCategory"></span>
    <span class="groobeeProductCategoryName">{카테고리명}</span>
</div>
<!-- End of Groobee Selector Script -->
주문완료 페이지 (PU)
- 위사 쇼핑몰 관리자 페이지에 로그인 한 후, 디자인 > 디자인관리 > 스크립트 매니저에 접속하여 주문완료 스크립트를 작성합니다.
공통 스크립트 설치 가이드를 참고하여 스크립트 매니저에 스크립트를 추가한 경우,
해당 스크립트 내에 아래 예시의 주문완료 스크립트 부분을 추가로 작성해주시면 됩니다.
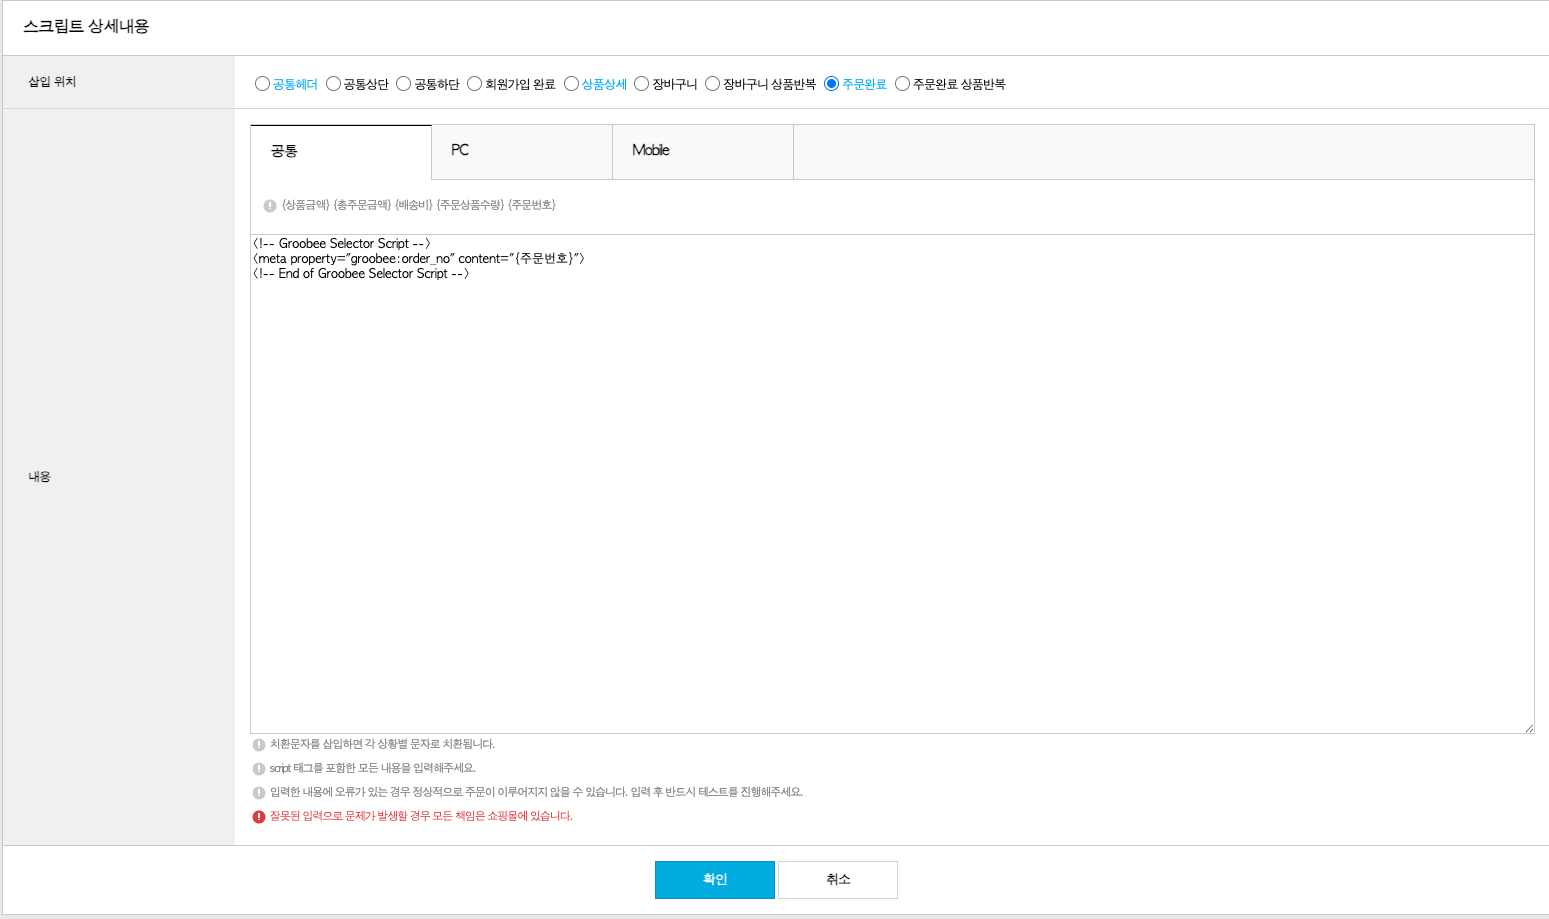
다음 단계
- 추천 캠페인 사용법 가이드로 이동하여 추천 캠페인 사용법을 확인해주세요.